[Tutorial][Pro] Basic MQTT setup & connect Itho Daalderop NRG.watch interface

This tutorial is about setting up a basic MQTT system.

(and yes I know there’s several other MQTT tutorials around :grimacing:)

Additionally, it tries to explain how to connect a system like the NRG.watch interface for Itho airboxes

(no need for the Homey NRG.watch app)

Feel free to add missing info, or correct any possible errors.
(This is a wiki)

Homey:

1
Install 3 MQTT community apps:

  • MQTT Broker [1]
  • MQTT Client
  • MQTT Hub
    • ¹) The broker may run anywhere, but we stick to Homey for now

2
Configure the broker and client;

  • In this example, Homey’s IP address is 192.168.12.34replace this with your Homey’s IP address
  • Make up your own username and password
  • The default MQTT portnumber is 1883

MQTT Broker


.

MQTT Client

Use the same user/pw as you entered at the broker configuration
Enter Homey’s IP address as broker IP

3

MQTT Hub

No configuration needed, but make sure it runs:

Then it connects with the MQTT Client app automatically

not-Homey:

4

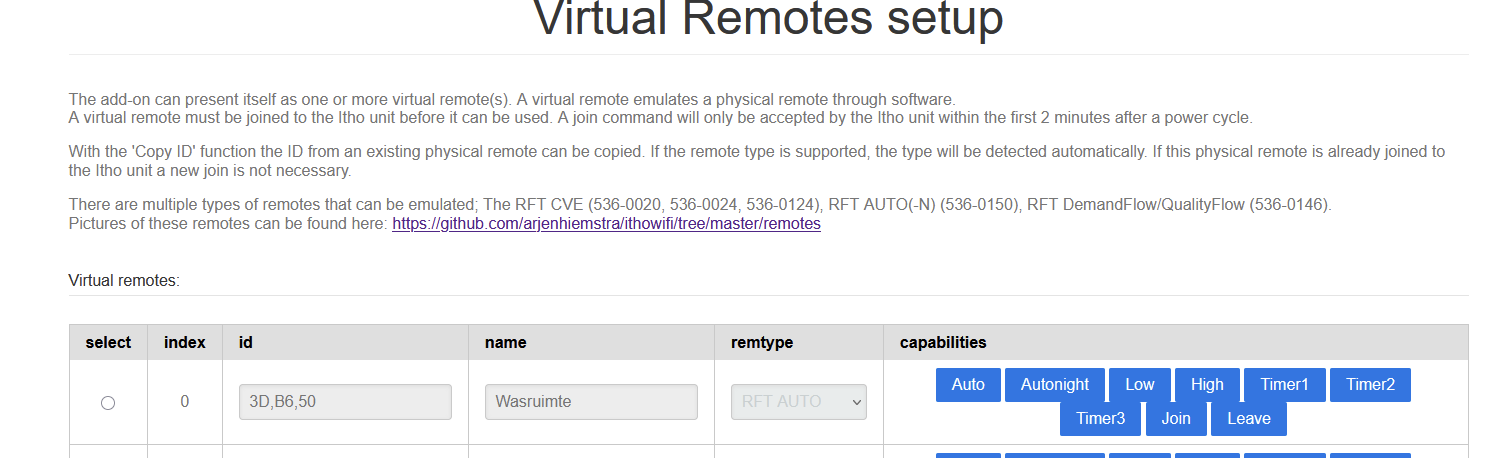
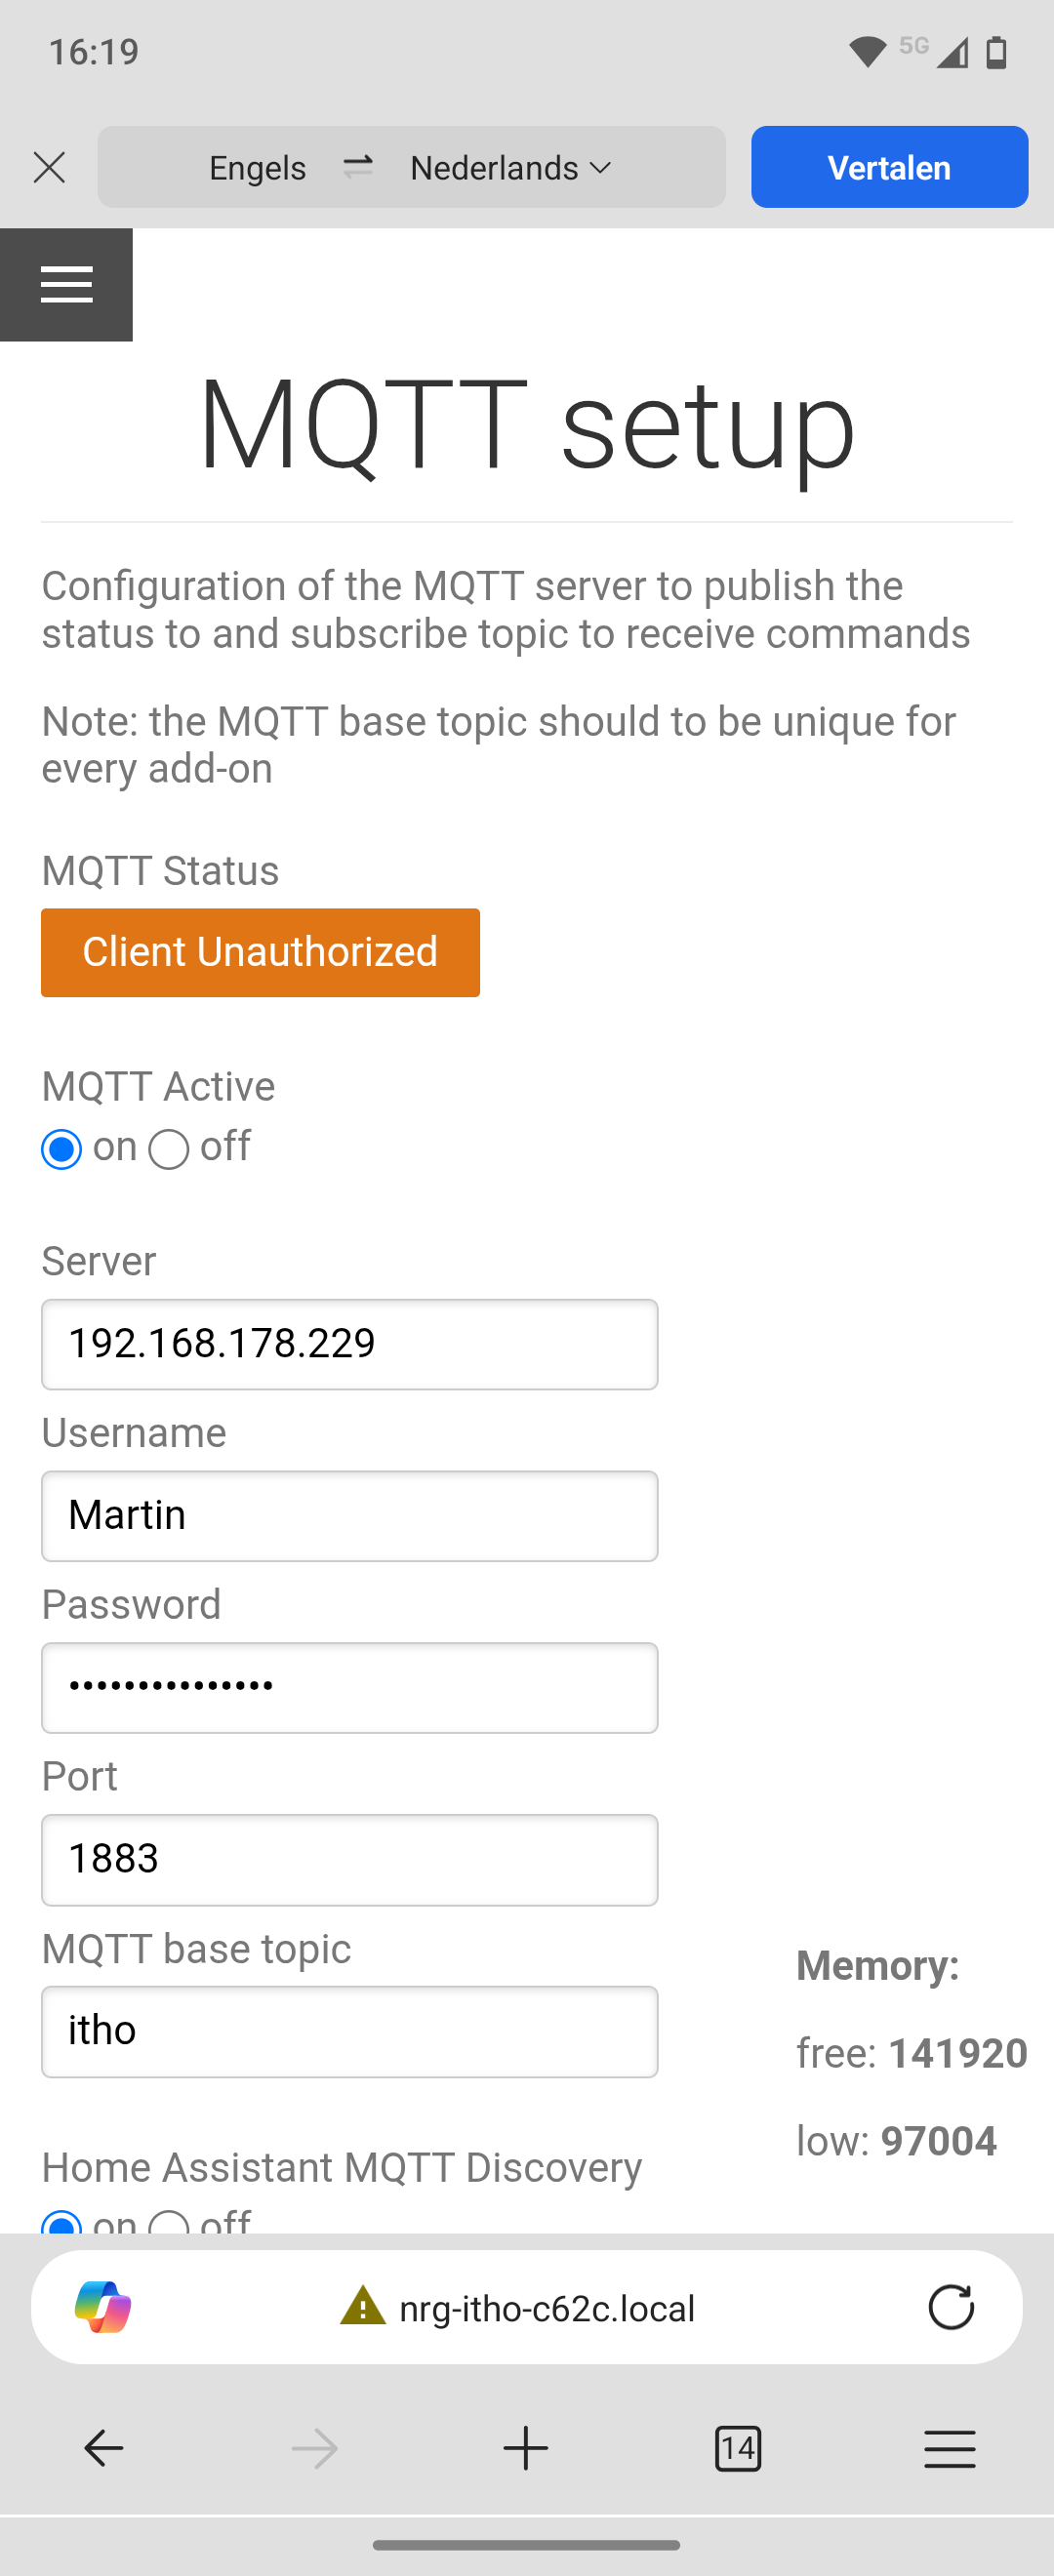
NRG.Watch Itho interface

Use the same user/pw as you entered at the broker configuration
Enter Homey’s IP address as broker IP

If all’s configured well, the systems now can communicate.
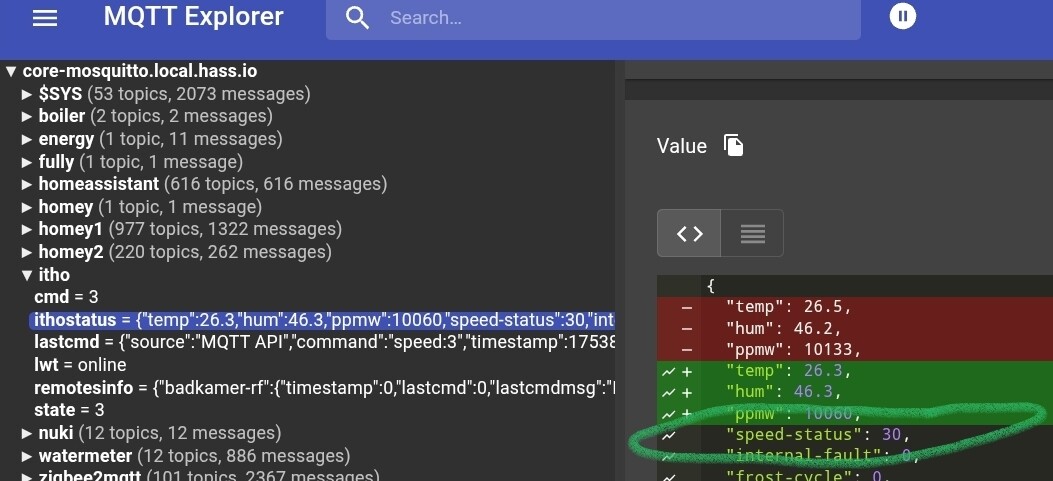
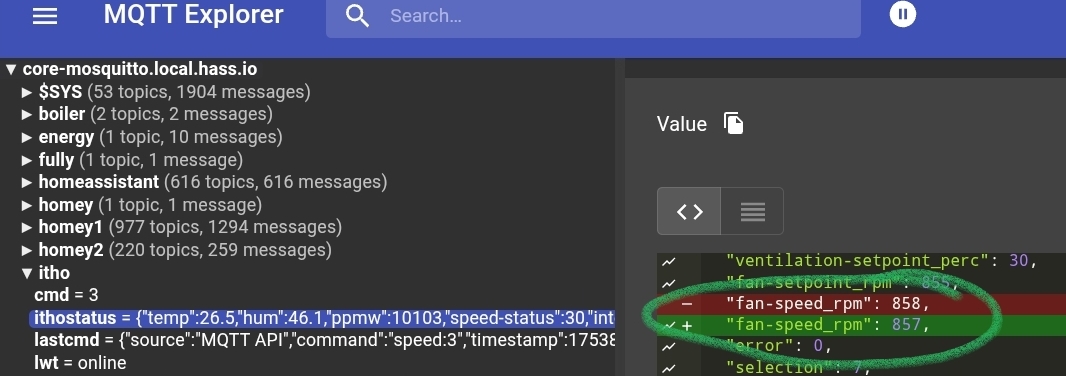
You can use the MQTT Explorer software to confirm, see Troubleshoot section below

Homey:

5

MQTT Hub virtual device

With use of such a VD, you can control and monitor your airbox

  • add a device, pick MQTT Hub

  • no need to create anything now, just save it

  • go to Settings > Advanced settings of this device

  • at Device Class select “Fan”

  • now tap “Topics” at the *Advanced section

  • Now copy this topics JSON below, and paste it into the aforementioned Topics field

{ 
  "fan_speed": {
    "capability": "fan_speed",
    "stateTopic": "itho/state",
    "setTopic": "itho/cmd",
    "valueTemplate": "round((value / 255) * 100)",
    "outputTemplate": "round((value / 100) * 255)",
    "displayName": "Fan speed control"
  },
  "fan_mode": { 
    "capability": "fan_mode", 
    "stateTopic": "itho/ithostatus", 
    "setTopic": "itho/cmd", 
    "valueTemplate": "", 
    "outputTemplate": "", 
    "displayName": "Fan presets", 
    "values": [
  { "id": "low", "title": "low" }, 
  { "id": "medium", "title": "medium" }, 
  { "id": "high", "title": "high" },
  { "id": "timer1", "title": "timer1" }, 
  { "id": "timer2", "title": "timer2" }, 
  { "id": "timer3", "title": "timer3" } 
] 
  },
  "measure_number.speedrpm": {
    "capability": "measure_number.speedrpm",
    "stateTopic": "itho/ithostatus",
    "setTopic": "",
    "valueTemplate": "$['fan-speed_rpm']",
    "outputTemplate": "",
    "displayName": "Speed (rpm)"
  },
  "measure_number.speed%": {
    "capability": "measure_number.speed%",
    "stateTopic": "itho/ithostatus",
    "setTopic": "",
    "valueTemplate": "$['speed-status']",
    "outputTemplate": "",
    "displayName": "Speed (%)"
  },
  "measure_temperature": {
    "capability": "measure_temperature",
    "stateTopic": "itho/ithostatus",
    "setTopic": "",
    "valueTemplate": "$['temp']",
    "outputTemplate": "",
    "displayName": "Temperature"
  },
  "measure_humidity": {
    "capability": "measure_humidity",
    "stateTopic": "itho/ithostatus",
    "setTopic": "",
    "valueTemplate": "$['hum']",
    "outputTemplate": "",
    "displayName": "Humidity"
  },
  "measure_string.lastcmd": {
    "capability": "measure_string.lastcmd",
    "stateTopic": "itho/lastcmd",
    "setTopic": "",
    "valueTemplate": "$['command']",
    "outputTemplate": "",
    "displayName": "Last command"
  },
"measure_number.ppmw": {
    "capability": "measure_number_ppmw",
    "stateTopic": "itho/ithostatus",
    "setTopic": "",
    "valueTemplate": "$['ppmw']",
    "outputTemplate": "",
    "displayName": "ppmw"
  },
  "measure_number.opshrs": {
    "capability": "measure_number.opshrs",
    "stateTopic": "itho/ithostatus",
    "setTopic": "",
    "valueTemplate": "$['total-operation_hours']",
    "outputTemplate": "",
    "displayName": "Running hrs"
  }
}

You’re free to use your own names for the values at “displayName” and “title”

Now you’d have a device like this:

.

Flow cards

.

Troubleshoot

Install MQTT Explorer to view the actual topics and messages transmissions
Again you enter the user/pw as you entered at the broker configuration, and Homey’s IP address (the broker IP):

→ also available as Home Assistant add-on

New (14 sept 2025):

When MQTT is not for you,
A new NRG Itho Daalderop app is published:
https://community.homey.app/t/app-pro-itho-daalderop-make-ventilation-smart-with-homey-and-nrg-watch/142944


  1. Footnotes ↩︎

8 Likes

Thanks Peter!

It works immediately and controls the Itho perfect.

So good after trying in vain to connect the NRG wifi-controller to the NRG watch app.

There is a small detail that doesn’t work. That’s the indicator for Speed rpm and Speed %.

See below:

The other functions do all work fine.

Any suggestion how to fix that?

1 Like

Thanks for confirming the manual makes sense, Sipke :zany_face::wink:

Can you show the MQTT Explorer screen with the itho/ithostatus topic? Especially the speed-status and fan-speed_rpm (or something similar), like this:

Because it shouldn’t, but it could be possible they’re not named exactly the same with our NRG add-ons….

The point is, these names should match with the ones of the valueTemplates in the MQTT device:

When the names appear to be different at MQTT Explorer, you should adjust the ones in MQTT device topics to have it matching.

Does this make sense? Just ask when things are unclear.

It’s fixed, Peter!

I had to adjust the two names and now the speed indicators are OK.

Thanks for your quick reaction, Sipke.

1 Like

Peter,

de beschreven installatie is voor mij te ingewikkeld. Er is echter een NRG litho app maar die krijg ik niet geinstalleerd op mijn Homey Pro 2019 is daar een oorzaak bekend? Ook met ip adres lukt het niet.

Groetjes Co Noordhoek

Hi Co,

Ah that’s annoying. On my 2 Pro 2019s, the NRG Watch app cannot find the module either.

It is a known problem, but unfortunately the app maker hasn’t found an opportunity to publish a fix yet.

Peter,

Als ik deze link ( http://ip.adres.hier/api.html?get=ithostatus ) met mijn ip adres invoer krijg ik het onderstaande, krijg blijkbaar dan toch verbinding, de aanwezige fout kan niet zo heel groot zijn denk ik, maar ik heb te weinig kennis om te zien wat er fout gaat.

Heb de app nogmaals geprobeerd en zie iets voorbij flitsen waarna de foutmelding verschijnt

Groetjes Co Noordhoek

{“temp”:25.4,“hum”:47.8,“ppmw”:9807,“Ventilation setpoint (%)”:4,“Fan setpoint (rpm)”:652,“Fan speed (rpm)”:809,“Error”:0,“Selection”:7,“Startup counter”:150,“Total operation (hours)”:38443,“Absence (min)”:0,“Highest CO2 concentration (ppm)”:“not available”,“Highest RH concentration (%)”:“not available”,“RelativeHumidity”:“not available”,“Temperature”:“not available”}

Hi Co,

Indeed, I have. Everything works except pairing with the Homey NRG. Watch app.

The app maker wrote last October, that these “not available” values, probably throw a spanner in the works:

Been fiddling with the app code myself, but unfortunately no luck yet (am really a :potato: in terms of (app) code).

@Peter_Kawa Thanks for your tutorial! I have the MQTT Hub, Broker, and Client up and running, and everything is set correctly in the NRG Watch interface.

Now here’s the thing — I have other parameters I can read… but I don’t see any data coming in.
In MQTT Explorer I see this (also in NRG’s web interface, by the way).

{
   "Operating mode":2,
   "Operating phase IBS":0,
   "Operating status":0,
   "Setting":0,
   "RH extractor (%)":0,
   "RH kitchen (%)":0,
   "RH toilet 1 (%)":0,
   "RH living room 1 (%)":0,
   "RH living room 2 (%)":0,
   "RH laundry room (%)":0,
   "RH bathroom 1 (%)":73,
   "RH bathroom 2 (%)":0,
   "RH bedroom 1 (%)":0,
   "RH bedroom 2 (%)":0,
   "RH bedroom 3 (%)":0,
   "RH bedroom 4 (%)":0,
   "exhaust fan (%)":12,
   "supply fan (%)":5,
   "CO2 plenum (ppm)":805,
   "CO2 calculated (ppm)":808,
   "Calculated CO2 extractor (ppm)":808,
   "Calculated CO2 kitchen (ppm)":1098,
   "Calculated CO2 toilet1 (ppm)":639,
   "Calculated CO2 living room 1 (ppm)":815,
   "Calculated CO2 living room 2 (ppm)":0,
   "Calculated CO2 washroom (ppm)":468,
   "Calculated CO2 bathroom1 (ppm)":726,
   "Calculated CO2 bath2 + toilet2 (ppm)":0,
   "Calculated CO2 bedroom 1 (ppm)":419,
   "Calculated CO2 bedroom 2 (ppm)":584,
   "Calculated CO2 bedroom 3 (ppm)":946,
   "Calculated CO2 bedroom 4 (ppm)":0,
   "Calculated pos valve extractor":9,
   "calculated pos flap kitchen":9,
   "Calculated pos flap toilet 1":9,
   "Calculated pos flap living room 1":9,
   "Calculated pos flap living room 2":0,
   "Calculated pos flap laundry room":9,
   "Calculated pos flap bathroom1":13,
   "Calculated pos valve bath2+toilet2":0,
   "Calculated pos valve bedroom1":0,
   "Calculated pos flap bedroom 2":100,
   "Calculated pos flap bedroom 3":9,
   "Calculated pos damper bedroom 4":0,
   "Calculated Flow extractor hood (m3_h)":5,
   "Calculated Flow kitchen (m3_h)":5,
   "Calculated Flow toilet 1 (m3_h)":5,
   "Calculated Flow living room 1 (m3_h)":5,
   "Calculated Flow living room 2 (m3_h)":0,
   "Calculated Flow laundry room (m3_h)":5,
   "Calculated Flow bathroom 1 (m3_h)":7,
   "Calculated Flow bath2+toilet2 (m3_h)":0,
   "Calculated Flow bedroom1 (m3_h)":0,
   "Calculated Flow bedroom 2 (m3_h)":25,
   "Calculated Flow bedroom 3 (m3_h)":5,
   "Calculated Flow bedroom 4 (m3_h)":0,
   "Error":0,
   "Measuring interval (sec)":88,
   "Timer extractor (sec)":0,
   "Time increase bathroom 1 (sec)":0,
   "Time increment bathroom 2 (sec)":0,
   "3_6_9 hours DemandFlow timer (sec)":0,
   "CO2 measurement room":10,
   "Measurement method":1,
   "Flow adjusted":0,
   "Status normal":1,
   "Status high extractor hood":0,
   "Status high bathroom":0,
   "Status high extractor hood and bathr.":0,
   "Status timer":0,
   "Status manual control":0,
   "Status reserved":0,
   "Status eco comfort":0,
   "Status limited ventilation":0,
   "Status not at home":0
}

I can’t get the JSON adjusted so that I can read, for example, some of these parameters.

Aside from that — I see that people create flows with GET requests to retrieve data and write it to a number. Do I also need to do this to keep the data updating, or am I missing something?

Hi Robo09!

You’re welcome! (please keep the topic in English)

You have a rather “extended” Itho unit it seems?
Oh and would you please edit your post and format the JSON output by the API as code? (just add three backtics ``` above and below) → F.i. now it’s full of fancy " double quotes, which are unusable with copy/paste actions. In js code & JSON only straight " (double) quotes are allowed.

Okay, back to work: it is possible to brew a JSON from it for the MQTT device, can you specify which values you want to see (to start with) in Homey?
Fan speed should just work…

I now picked a few values from your API output and added them to the JSON below; Could you copy/paste this JSON into the virtual MQTT device? I’m curious if it’ll (partly) work:

{
    "fan_speed": {
    "capability": "fan_speed",
    "stateTopic": "itho/state",
    "setTopic": "itho/cmd",
    "valueTemplate": "round((value / 255) * 100)",
    "outputTemplate": "round((value / 100) * 255)",
    "displayName": "Fan Speed"
  },
  "fan_mode.timer": { 
    "capability": "fan_mode.timer", 
    "stateTopic": "itho/ithostatus", 
    "setTopic": "itho/cmd", 
    "valueTemplate": "", 
    "outputTemplate": "", 
    "displayName": "Timer mode", 
    "values": [
 { "id": "timer1", "title": "30m boost" }, 
{ "id": "timer2", "title": "60m boost" }, 
{ "id": "timer3", "title": "120m boost" } 
] 
  },
  "fan_mode": { 
    "capability": "fan_mode", 
    "stateTopic": "itho/ithostatus", 
    "setTopic": "itho/cmd", 
    "valueTemplate": "", 
    "outputTemplate": "", 
    "displayName": "Fan mode", 
    "values": [
 { "id": "low", "title": "Low" }, 
{ "id": "medium", "title": "Medium" }, 
{ "id": "high", "title": "High" } 
] 
  },
  "measure_number.supplyfan": {
    "capability": "measure_number.supplyfan",
    "stateTopic": "itho/ithostatus",
    "setTopic": "",
    "valueTemplate": "$['supply fan (%)']",
    "outputTemplate": "",
    "displayName": "Supply Fan %"
  },
  "measure_number.exhfan": {
    "capability": "measure_number.exhfan",
    "stateTopic": "itho/ithostatus",
    "setTopic": "",
    "valueTemplate": "$['exhaust fan (%)']",
    "outputTemplate": "",
    "displayName": "Exhaust Fan %"
  },
  "measure_humidity.bathr1": {
    "capability": "measure_humidity.bathr1",
    "stateTopic": "itho/ithostatus",
    "setTopic": "",
    "valueTemplate": "$['RH bathroom 1 (%)']",
    "outputTemplate": "",
    "displayName": "Rel.Humidity Bathr.1"
  },
  "measure_co2.room": {
    "capability": "measure_co2.room",
    "stateTopic": "itho/ithostatus",
    "setTopic": "",
    "valueTemplate": "$['CO2 measurement room']",
    "outputTemplate": "",
    "displayName": "CO2 Room measured"
  }
}

You should / could notice changing values at the itho/cmd and itho/state topics, when you send commands per MQTT
.

That’s an non-MQTT related alternative way to also control/read the itho unit using direct commands. When you browse to http://nrg.local (or the IP address of the unit) and tap ‘API’ on the menu on the left, you’ll get all info. Also you’ll find all info I found @ the wiki and the manual (download)

But let’s start a separate topic for the API part.

@Peter_Kawa legend! sorry for my messy post :wink: was doing this on my phone and that is not ideal.. I edited the post in English + code block

Your sample works like a charm - e.g. the measures. The remote control probably not (not tested it) but I want to add some JSON so I can use the virtual remotes that I created in NRG watch.

So the goal is - measures, I know how I can do this now :slight_smile: so I am going to pick the values I want and add them. The other part I want to do is make use of the virtual remotes I added. So per room I added a virtual remote that I can set the Itho to High , Low or Auto :wink: This is especially interesting for the bathroom, it is not working well now.

I figured that the API was a alternative way.. I am doubting which one works best for my situation.. not sure yet

Oh btw - I have a HRU eco (looks like the HRU350) but on top of that I have a plenum with a demandflow controller… the NRG is on the Demandflow controller - this thing is controlling my ventilation unit. If I put the NRG in the HRU350 directly.. I get different measures like outside temp etc

1 Like
{
  "measure_number.supplyfan": {
    "capability": "measure_number.supplyfan",
    "stateTopic": "itho/ithostatus",
    "setTopic": "",
    "valueTemplate": "$['supply fan (%)']",
    "outputTemplate": "",
    "displayName": "Supply Fan %"
  },
  "measure_number.exhfan": {
    "capability": "measure_number.exhfan",
    "stateTopic": "itho/ithostatus",
    "setTopic": "",
    "valueTemplate": "$['exhaust fan (%)']",
    "outputTemplate": "",
    "displayName": "Exhaust Fan %"
  },
  "measure_humidity.bathr1": {
    "capability": "measure_humidity.bathr1",
    "stateTopic": "itho/ithostatus",
    "setTopic": "",
    "valueTemplate": "$['RH bathroom 1 (%)']",
    "outputTemplate": "",
    "displayName": "Rel.Humidity Bathr.1"
  },
  "measure_co2.room_kitchen": {
    "capability": "measure_co2.room",
    "stateTopic": "itho/ithostatus",
    "setTopic": "",
    "valueTemplate": "$['Calculated CO2 kitchen (ppm)']",
    "outputTemplate": "",
    "displayName": "CO2 Kitchen"
  },
  "measure_co2.room_livingroom1": {
    "capability": "measure_co2.room",
    "stateTopic": "itho/ithostatus",
    "setTopic": "",
    "valueTemplate": "$['Calculated CO2 living room 1 (ppm)']",
    "outputTemplate": "",
    "displayName": "CO2 Living Room"
  },
  "measure_co2.room_bathroom": {
    "capability": "measure_co2.room",
    "stateTopic": "itho/ithostatus",
    "setTopic": "",
    "valueTemplate": "$['Calculated CO2 bathroom1 (ppm)']",
    "outputTemplate": "",
    "displayName": "CO2 Bathroom"
  },
  "measure_co2.room_toilet": {
    "capability": "measure_co2.room",
    "stateTopic": "itho/ithostatus",
    "setTopic": "",
    "valueTemplate": "$['Calculated CO2 toilet1 (ppm)']",
    "outputTemplate": "",
    "displayName": "CO2 Toilet"
  },
  "measure_co2.room_washroom": {
    "capability": "measure_co2.room",
    "stateTopic": "itho/ithostatus",
    "setTopic": "",
    "valueTemplate": "$['Calculated CO2 washroom (ppm)']",
    "outputTemplate": "",
    "displayName": "CO2 Washingroom"
  },
  "measure_co2.room_bedroom1": {
    "capability": "measure_co2.room",
    "stateTopic": "itho/ithostatus",
    "setTopic": "",
    "valueTemplate": "$['Calculated CO2 bedroom 1 (ppm)']",
    "outputTemplate": "",
    "displayName": "CO2 Bedroom1"
  },
  "measure_co2.room_bedroom2": {
    "capability": "measure_co2.room",
    "stateTopic": "itho/ithostatus",
    "setTopic": "",
    "valueTemplate": "$['Calculated CO2 bedroom 2 (ppm)']",
    "outputTemplate": "",
    "displayName": "CO2 Bedroom2"
  },
  "measure_co2.room_bedroom3": {
    "capability": "measure_co2.room",
    "stateTopic": "itho/ithostatus",
    "setTopic": "",
    "valueTemplate": "$['Calculated CO2 bedroom 3 (ppm)']",
    "outputTemplate": "",
    "displayName": "CO2 Bedroom3"
  },
  "fan_mode.wasruimte": {
    "capability": "fan_mode",
    "stateTopic": "itho/ithostatus",
    "setTopic": "itho/cmd",
    "valueTemplate": "",
    "outputTemplate": "{\"id\": \"3D,B6,50\", \"cmd\": \"[[value]]\"}",
    "displayName": "Wasruimte Mode",
    "values": [
      { "id": "auto", "title": "Auto" },
      { "id": "low", "title": "Low" },
      { "id": "high", "title": "High" }
    ]
  },
  "fan_mode.badkamer": {
    "capability": "fan_mode",
    "stateTopic": "itho/ithostatus",
    "setTopic": "itho/cmd",
    "valueTemplate": "",
    "outputTemplate": "{\"id\": \"3D,B6,51\", \"cmd\": \"[[value]]\"}",
    "displayName": "Badkamer Mode",
    "values": [
      { "id": "auto", "title": "Auto" },
      { "id": "low", "title": "Low" },
      { "id": "high", "title": "High" }
    ]
  }
}

With the code above, I can read all the measures I want – that’s great! Now I actually want a few simple buttons, for example, as a test here for the laundry room and bathroom. The virtual remote in NRG works well (laundry room and bathroom added), and there are buttons like Auto – High – Low, etc. For now, I only want High, Low, and Auto as buttons in Homey on that virtual remote.

With the code above, I have a nice dropdown with laundry room and bathroom – and the three buttons – but as soon as I click on them, I get:
“Missing Capability Listener: fan_mode.laundry_room”

PS – the code is Gemini – works reasonably well but I’m probably missing something, which is why it doesn’t work now.

1 Like

(please translate your posts to English)

Looking good, Robo.

The mode “trick” should work like this (no “outputTemplate” value); because you declared fan_mode capability twice, it errors.
Add a subcapability like fan_mode.badkamer:

  "fan_mode.wasruimte": {
    "capability": "fan_mode.wasruimte",
    "stateTopic": "itho/ithostatus",
    "setTopic": "itho/cmd",
    "valueTemplate": "",
    "outputTemplate": "",
    "displayName": "Wasruimte Mode",
    "values": [
      { "id": "auto", "title": "Auto" },
      { "id": "low", "title": "Low" },
      { "id": "high", "title": "High" }
    ]
},
  "fan_mode.badkamer": { 
    "capability": "fan_mode.badkamer", 
    "stateTopic": "itho/ithostatus", 
    "setTopic": "itho/cmd", 
    "valueTemplate": "", 
    "outputTemplate": "", 
    "displayName": "Badkamer Mode", 
    "values": [
      { "id": "auto", "title": "Auto" },
      { "id": "low", "title": "Low" },
      { "id": "high", "title": "High" }
    ]
  }

Hope this works!

thanks! (translated my post) - at first it gave the same error “Missing Capability Listener” but I read on another topic that a restart might solve this.

The error is gone - but the buttons unfortunately don’t work. If I click my virtual remote in NRG on High (for example the laundry room) then I hear the Itho fan making a lot of noise :slight_smile: - when I click Auto it becomes silent again so for me is an indication the buttons work.

The buttons in Homey are not triggering this :frowning: been talking to Gemini all night but we can’t solve it yet hehe

also this part:

  "outputTemplate": "{\"id\": \"3D,B6,51\", \"cmd\": \"[[value]]\"}"

this is where I thought I could trigger the Virtual remote (it has an ID) so the Demandflow knows what to do

Cool, thx for translating.

To make sure we talk about the same: what do you mean by “virtual remote” exactly?
I consider the virtual MQTT device to be a virtual remote, which doesn’t need the output template you (or Gemini) proposed.

.

Hmmmm, when searching for stuff I took a closer look to the support matrix. It says (to me) you can’t control the Demandflow controller:

Not sure why that is in the Github still :slight_smile:

Virtual remote - I put the demandflow unit in learning mode and then created a virtual remote in NRG web interface en send a join from there. This way I could get every room as “virtual remote“ in NRG. In NRG I have buttons per room that I can click and the demandflow is responding to this.

So I think it works fine (also Arjen himself told me that via Tweakers :)). So the problem lies in the fact that I can’t reach this Virtual Remote via MQTT yet. It must be possible but not sure how..

Maybe good to add - on the demandflow I have per room an indicator light. With the physical remote I could go from room A to B and join via the webinterface. Then I gave it a name (the ID is being filled based on the Join I think - it is different per room)

Ah, that’s way clearer.
Well, after lots and lots of searching and reading, I came to the conclusion it should work like this:

For non-CVE units, to control the fan speed, there’s only low/medium/high/timer (no auto and no 1-100% range available):
@ web interface, you only need to

  • copy one physical remote as virtual remote
  • give it a different name
  • make sure the right remote (remtype) is selected
  • press the Join button
    all within 2 minutes after powering up the box.
    (you probably knew this part already)

Now you’d be able to control the fan speed with this JSON inside the MQTT device:

  "fan_mode.generic": { 
    "capability": "fan_mode.generic", 
    "stateTopic": "itho/ithostatus", 
    "setTopic": "itho/cmd", 
    "valueTemplate": "", 
    "outputTemplate": "", 
    "displayName": "Fan mode (Generic)", 
    "values": [
 { "id": "low", "title": "Low" }, 
{ "id": "medium", "title": "Medium" }, 
{ "id": "high", "title": "High" } 
] 
  },

.
https://github.com/arjenhiemstra/ithowifi/wiki/Non-CVE-units-support#how-to-configure

Hey, I’ve tried the Tutorial but got stuck on ‘step 4’. When I hit save the MQTT setup gives me the following in orange: Client Unauthorized.

Does anybody know what to do? I don’t have any experience with MQTT :grin:

Also the following from Homey:

Hi Martin,

Did you configure the MQTT broker, step 2?

Just to make sure: When you run the broker @ Homey, is this Homey’s IP address?

Make sure to reserve an IP address at your DHCP server (usually your ISP’s router) for Homey, it should never change.

However, the error message “unauthorised” says the user and/or password are not the same as the one(s) you entered @ the Broker configuration;
User / passwords are case sensitive; Martin is not the same as martin for example.
Often mobile devices auto capitalize the first word in a user / password field.

1 Like

Thanks for your reply. It works now :partying_face: except for the speed rpm/%. I already saw this in an earlier post, so I need to try this out. If I’m correct; I need MQTT Explorer to check for the correct names: the following:

But now I not sure what needs to be changed :grin: