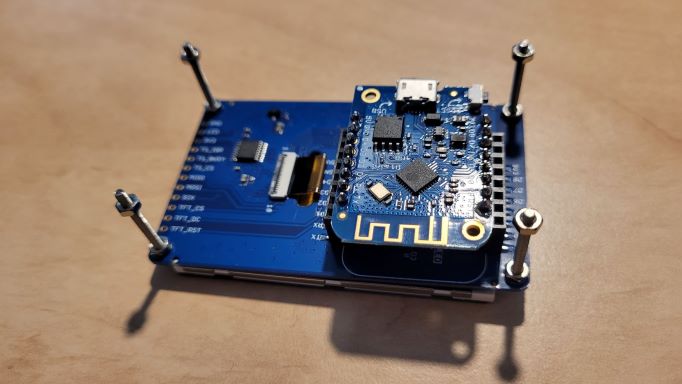
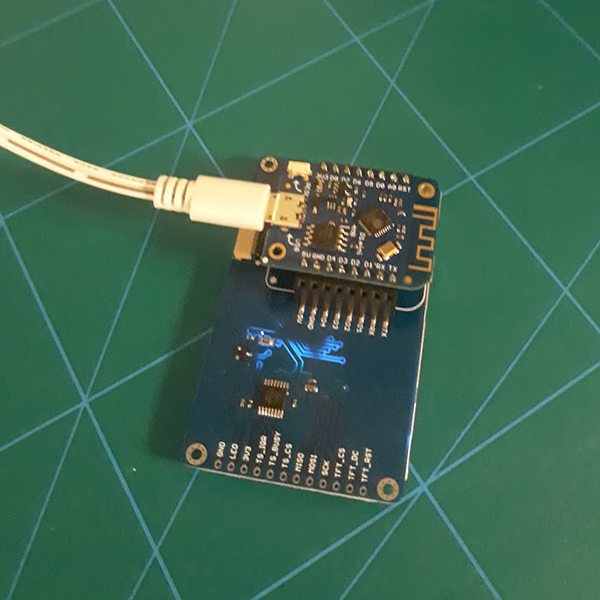
Just thought that I could share the Arduino code for my small Homeyduino display project. It is based on a small Wemos D1 mini and its tft 2.4 touch screen display, (found here https://www.aliexpress.com/item/32919729730.html). Not much soldering (just the pins on the Wemos). To be able to trigger a Homey flow by touching the screen you first have to touch the screen once and then create the device flow card. The code is substantially based on code by maxxie01 from the Homeyduino channel on Slack.
!
!
!

Here’s the code (some hardcoded degree symbols and a custom font from http://oleddisplay.squix.ch/ but other than that you can just start using it). When you have uploaded the code to the board you can log in to the wifi of the device and set up SSID and so on.
/*
   Homey Arduino library
   Usage example for use with ESP8266

   Most of the code in this file comes from the ethernet usage examples included with Arduino
   Also the code at https://www.arduino.cc/en/Tutorial/BlinkWithoutDelay has been included to
   show you how to read sensors and emit triggers without using the delay function.

*/

#include <ESP8266WiFi.h>
#include <WiFiClient.h>
#include <WiFiManager.h>
#include <Homey.h>
#include <SPI.h>                //I2C interface for OLED display
#include <Wire.h>               //I2C interface for OLED display
#include <Adafruit_GFX.h>
#include <Adafruit_ILI9341.h>
#include <XPT2046_Touchscreen.h>
#include <Fonts\URW_Gothic_L_Demi_20.h> // custom fonts, see http://oleddisplay.squix.ch/#/home
#include <Fonts\URW_Gothic_L_Demi_70.h>


//Wifi manager starts as AccessPoint if there is no wifi connection
WiFiManager wifiManager;

//OLED config
#define TFT_CS D0  //for D1 mini or TFT I2C Connector Shield (V1.1.0 or later)
#define TFT_DC D8  //for D1 mini or TFT I2C Connector Shield (V1.1.0 or later)
#define TFT_RST -1 //for D1 mini or TFT I2C Connector Shield (V1.1.0 or later)
#define TS_CS D3   //for D1 mini or TFT I2C Connector Shield (V1.1.0 or later)

//Global variables used for the blink without delay example
unsigned long previousMillis = 0;
const unsigned long interval = 5000; //Interval in milliseconds

//put text received from Homey into this
//if number of rows are changed, change this
String textRow[] = {"","","","","","","","",""};
String receivedHomey;

IPAddress ip;
bool isFirst = true;
byte t = 0; //wait
String textWait[] = {"-","\\","/"};
bool success;

Adafruit_ILI9341 tft = Adafruit_ILI9341(TFT_CS, TFT_DC, TFT_RST);
XPT2046_Touchscreen ts(TS_CS);

//Arduino functions
void setup() {
  //Enable serial port
  Serial.begin(115200);
  Serial.println("Setup start");

  //init OLED display
  tft.begin();
  delay(500);

  // init touch
  ts.begin();
  ts.setRotation(1);

  //Connect to network
  String deviceName = "OLED-" + String(ESP.getChipId()); //Generate device name based on ID
  Serial.print("wifiManager...");
  Serial.println(deviceName);
  wifiManager.autoConnect(deviceName.c_str(), ""); //Start wifiManager
  Serial.println("  Connected!");
  ip = WiFi.localIP();
  Serial.print(" IP address: ");
  Serial.println(ip.toString());

  showText(3, "IP number", false);
  showText(3, ip.toString(), true);

  //Start Homey library
  Homey.begin("arduinodisplay");
  Homey.setClass("sensor");

  Homey.addAction("Row1", onArduinoReceivedText1);
  Homey.addAction("Row2", onArduinoReceivedText2);
  Homey.addAction("Row3", onArduinoReceivedText3);
  Homey.addAction("Row4", onArduinoReceivedText4);
  Homey.addAction("Row5", onArduinoReceivedText5);
  Homey.addAction("Row6", onArduinoReceivedText6);
  Homey.addAction("Row7", onArduinoReceivedText7);
  Homey.addAction("Row8", onArduinoReceivedText8);
  Homey.addAction("Background", onArduinoReceivedBackground);

  Serial.println("Setup completed");
}

void loop() {

  // touch trigger to Homey
  // run the trigger once, then it appears as a device flow card

  if (ts.touched())
  {

    Homey.trigger("touch", "touch");
    Serial.println("touch");

  }

  //Handle incoming connections
  Homey.loop();
  /* Note:
      The Homey.loop(); function needs to be called as often as possible.
      Failing to do so will cause connection problems and instability.
      Avoid using the delay function at all times. Instead please use the
      method explaind on the following page on the Arduino website:
      https://www.arduino.cc/en/Tutorial/BlinkWithoutDelay
  */

  //This is the 'blink without delay' code
  unsigned long currentMillis = millis();
  if (currentMillis - previousMillis > interval) {
    previousMillis = currentMillis;
    //(This code will be executed every <interval> milliseconds.)

    if (isFirst){
      Homey.trigger("IPnumber", ip.toString());
      isFirst = false;
    }

    //Emit a trigger to Homey
    //bool success = Homey.trigger("mytrigger", "Hello world");
    /* Note:
     *  The first argument to the emit function is the name of the trigger
     *  this name has to match the name used in the flow editor
     *
     *  The second argument to the emit function is the argument.
     *  An argument can be one of the following:
     *     - a string
     *     - an integer (int)
     *     - a floating point number (float or double),
     *     - a boolean (bool)
     *     - nothing (void)
     *
     *  Make sure to select the right type of flow card to match the type
     *  of argument sent to Homey.
     *  For a string argument the "text" flowcard is used.
     *  For an integer or floating point number the "number" flowcard is used.
     *  For the boolean argument the "boolean" flowcard is used.
     *  And when no argument is supplied the flowcard without argument is used.
     *
     */

  }
}

  /* Note:
   *
   *  The argument will always be received as a String.
   *  If you sent a number or boolean from homey then you can convert
   *  the value into the type you want as follows:
   *
   *   - Integer number: "int value = Homey.value.toInt();"
   *   - Floating point number: "float value = Homey.value.toFloat();"
   *   - Boolean: "bool value = Homey.value.toInt();"
   *   - String: "String value = Homey.value;"
   *
   * In case something goes wrong while executing your action
   * you can return an error to the Homey flow by calling
   * Homey.returnError("<message>");
   */

void onArduinoReceivedText1(){showText(1, Homey.value, true);}
void onArduinoReceivedText2(){showText(2, Homey.value, true);}
void onArduinoReceivedText3(){showText(3, Homey.value, true);}
void onArduinoReceivedText4(){showText(4, Homey.value, true);}
void onArduinoReceivedText5(){showText(5, Homey.value, true);}
void onArduinoReceivedText6(){showText(6, Homey.value, true);}
void onArduinoReceivedText7(){showText(7, Homey.value, true);}
void onArduinoReceivedText8(){showText(8, Homey.value, true);}

void onArduinoReceivedBackground(){tft.fillScreen(Homey.value.toFloat());

float tmpHomey = Homey.value.toFloat();
Serial.println("homey send: " + String(tmpHomey));
 }


void showText(byte row, String text, boolean show){
  Serial.print("row: ");
  Serial.print(row);
  Serial.print(", text: ");
  Serial.print(text);
  Serial.print(", show: ");
  Serial.print(show);
  textRow[row] = text;
  Serial.print(", textRow[row]: ");
  Serial.println(textRow[row]);


  if(show){
    //tft.fillScreen(ILI9341_BLACK);

    tft.fillCircle(175,33,5,65535);
    tft.fillCircle(175,103,5,65535);
    tft.setFont(&URW_Gothic_L_Demi_70);
    tft.setTextSize(1);
    tft.setTextColor(ILI9341_WHITE);
    tft.setCursor(10,80);
    tft.print(textRow[1]);
    tft.setCursor(175,80);
    tft.println("C");
    tft.setCursor(10,150);
    tft.print(textRow[2]);
    tft.setCursor(175,150);
    tft.println("C");
    tft.setFont(&URW_Gothic_L_Demi_20);
    tft.setCursor(10,198);
    tft.println(textRow[3]);
    tft.setCursor(10,220);
    tft.println(textRow[4]);
    tft.setCursor(10,242);
    tft.println(textRow[5]);
    tft.setCursor(10,264);
    tft.println(textRow[6]);
    tft.setCursor(10,286);
    tft.println(textRow[7]);
    tft.setCursor(10,308);
    tft.println(textRow[8]);
  }
}