Yes. I have already seen how you created two fields, one for the date and one for the time.
But, where can you change the font size each of them ?.
I know it’s a rookie question …
Yes. I have already seen how you created two fields, one for the date and one for the time.
But, where can you change the font size each of them ?.
I know it’s a rookie question …
i.m not home at the moment. tommorow i make a printscreen en show it.
Some info from the web
Thank you very much in advance!!!
Yes. I have seen that post. But, in the case of the date and time it does not work. Or at least I have been unable to make it work.
Grateful for the help.
I’ve also been struggling with the font sizes of a text node. Somehow I only could set about 3 sizes. Eventually I just use a template node and put a piece of html inside it. Just as easy:
<p style="font-size:70px; text-align: center; font-weight: bold;">{{msg.payload}}</p>
How do you make a special page for each device? I thougt all pages in node red started here at ip-adress:1880/ui?
Yes, misunderstand me right, within the ui you define as many pages you want for your devices/rooms.
@Tangodelta care to share your red node code?
Looks Great what you have done 

Hello @Satoer
Before I continue writing, I want to thank the dedication and the effort to explain things. It is appreciated, and much!
I know that I am very clumsy and I am learning little by little, based on tutorials and help how yours.
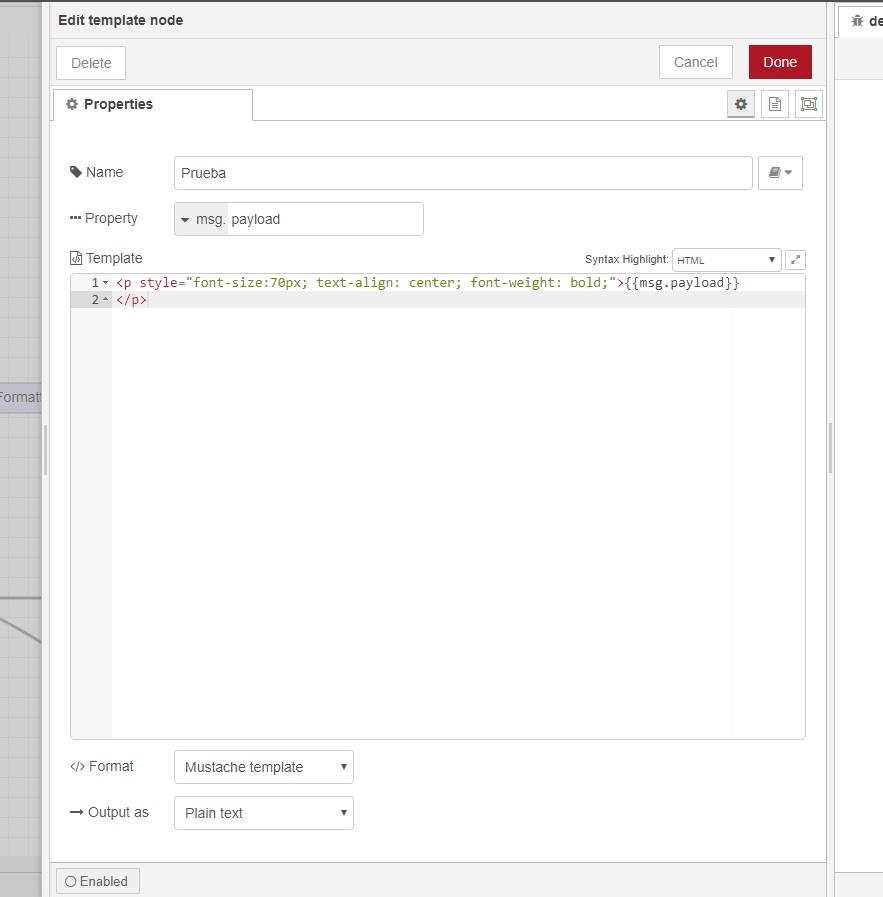
I created the template node and added the html code that you sent me in the way I attached it in the photo. But now he shows me nothing. He is sure that I am wrong and I ask for help to see where the fault may be.!
Thanks!!!
Thanks.
You’ve used the wrong template node. You need the blue/green dashboard template node. Not the orange function template node:

You don’t need the text node at the end of your screenshot. The template node shows the text.
Ahhhhhhh…just found out to make the layout 

You are referring to pages Node-red call the “Flows” right? I mean those tabs above the screen in the node-red “back-end” editor.
Or did you find a way to create more dashboards? I know I can create multiple pages with dashboards and swipe trough them (or by activating the menu), but I don’t know if you can create a complete separate dashboard on a different url.
What´s the recommended way of using the MQTT in Node Red? Adding more receives for each topic or using a function that will split out each topic to the correct nodes in the dashboard?
Both are possible, but using the split is more neat and does not create a subscription for each device to MQTT (network connection as well). Using split then you only need 2 MQTT connections, the incoming one and the outgoing one in Node-red. These 2 connections will be more busy with traffic of course.
I like to reduce network connections and like splitting as local process.
I don’t think it really matters. I even think splitting yourself will create extra workload. Every MQTT receiver node is connected to the (same) configured MQTT server. The server probably handles every MQTT communication. A MQTT receiver node probably isn’t more than a filter itself. If you going to wildcard this node and split / filter this again, you are actually adding extra workload to the system (you filter it twice). In the end it probably doesn’t really matter either way. I think adding more receiver nodes is neater.
In case of maintenance/changes at mqtt or devices; do you need to edit lots of mqtt recievers one by one or edit one big splitter.
Sorry @Satoer for not answering you before.
It worked very well!
Thank you for the explanation and for your time. Now, go for a weather forecast widget.
THANKS!!!
I have built some Esp8266 now with PIR sensors and ESp Easy software.
I now have setup so on my node red dashboard I got a red glowing square when a motion is detected.
But would also like a Timestamp or somethings that tell me when the latest movement was detected.
Does any one know how to do that ?
I do something similar with my doorbell. The dashboard is displaying a list when someone rings the doorbell and nobody’s home (with timestamp). (This list is displayed with the "UI control node, but I removed this for simplicity)
First I save the time in a global variable (I just kept the part where I save it to a global variable. In my case I also use this output to show the time on the dashboard).
[{"id":"f7659dad.57d9f","type":"inject","z":"467bd729.816768","name":"","topic":"","payload":"","payloadType":"date","repeat":"1","crontab":"","once":false,"onceDelay":0.1,"x":290,"y":660,"wires":[["ba05c850.2c39a"]]},{"id":"ba05c850.2c39a","type":"simpletime","z":"467bd729.816768","name":"Tijd","x":470,"y":660,"wires":[["5adef1da.d861a8"]]},{"id":"5adef1da.d861a8","type":"moment","z":"467bd729.816768","name":"","topic":"","input":"payload","inputType":"msg","inTz":"Europe/Berlin","adjAmount":"1","adjType":"hours","adjDir":"add","format":"HH:mm:ss","locale":"POSIX","output":"","outputType":"msg","outTz":"Etc/UTC","x":680,"y":660,"wires":[["ab0c78f6.64d5e8"]]},{"id":"ab0c78f6.64d5e8","type":"function","z":"467bd729.816768","name":"Store Time in global variable","func":"var Time=global.get(\"GlobalTime\") || '';\nglobal.set(\"GlobalTime\",msg.payload);\n\nreturn msg;","outputs":1,"noerr":0,"x":960,"y":660,"wires":[[]]}]
Then whenever someone rings the doorbell, I use the current time and add this to a list-node:
[{"id":"2c5a53b7.a352b4","type":"mqtt in","z":"e8b0aeb7.ea41","name":"Deurbel gedrukt niemand in huis","topic":"homey/doorbell/pressedaway","qos":"2","datatype":"auto","broker":"d776df12.63afa","x":290,"y":2360,"wires":[["e2e48528.a86328"]]},{"id":"e2e48528.a86328","type":"function","z":"e8b0aeb7.ea41","name":"Add bell warning to list","func":"var WaarschuwingLijst=flow.get(\"FlowWaarschuwingLijst\") || [];\nvar TimeVar=global.get(\"GlobalTime\") || '';\nWaarschuwingLijst.push({\"title\":TimeVar,\"description\":\": Aangebeld\",\"icon_name\":\"fa-bell\"});\nflow.set(\"FlowWaarschuwingLijst\",WaarschuwingLijst);\nmsg.payload = WaarschuwingLijst;\nreturn msg;","outputs":1,"noerr":0,"x":580,"y":2360,"wires":[["9a202a56.ac21"]]},{"id":"9a202a56.ac21","type":"ui_list","z":"e8b0aeb7.ea41","group":"74a5e2ed.11c31c","name":"List","order":2,"width":"6","height":"8","lineType":"three","actionType":"none","allowHTML":false,"outputs":0,"topic":"","x":790,"y":2360,"wires":[]},{"id":"d776df12.63afa","type":"mqtt-broker","z":"","name":"Homey MQTT","broker":"192.168.178.26","port":"1883","clientid":"","usetls":false,"compatmode":true,"keepalive":"60","cleansession":true,"birthTopic":"","birthQos":"0","birthPayload":"","closeTopic":"","closeQos":"0","closePayload":"","willTopic":"","willQos":"0","willPayload":""},{"id":"74a5e2ed.11c31c","type":"ui_group","z":"","name":"Waarschuwingen","tab":"f735aa47.f5cd18","order":9,"disp":true,"width":"6","collapse":false},{"id":"f735aa47.f5cd18","type":"ui_tab","z":"","name":"Homey Dashboard","icon":"dashboard","order":1,"disabled":false,"hidden":false}]
If you want to clear the list, just use this javascript behind a button:
flow.set('FlowWaarschuwingLijst',[]); return msg;
You probably need to install the list node if you want to use it the same way like I do.
But the essence is that you add a timestamp to a global array every time motion is detected.