Node Red: A widget based dashboard working with Homey trough MQTT

OK,

I could do with some help here. I connected some nodes to show whether:
a. the sound system is on or off (switch)
b. what the volume of the sound system is. (gauge)
I also created some buttons which set the volume to a certain level.
This is what it looks like:
image

At this point, it might be worth mentioning that I haven’t connected this to Homey yet. I first wanted to get the nodes connected properly.

For me, when the volume is zero, the system is off. I managed to get Node Red to automatically set the sound system (switch) to on/off when I select a certain level of volume or when using the button to set a preset volume. I also managed to set the volume (gauge) to zero when I turn off the sound system and I managed to set the volume (gauge) to the correct volume when I use a button to select a preset volume level. Still with me?

But now I want Node Red to remember the last volume level (example 8%) when I turn it off. When turning it on again, it should set it to the last known level again.

My current flow:


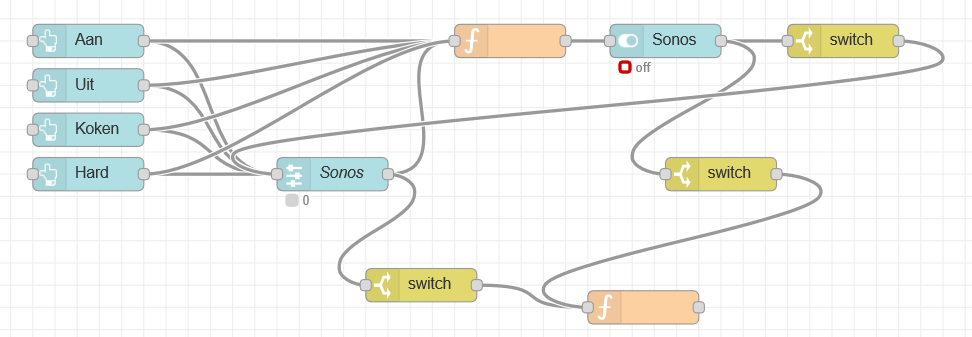
It shows the 4 buttons on the left, the volume-gauge called Sonos and the on/off switch (also called Sonos), which is preceded by a function whichs sets the input to either true or false (volume 0 > false, volume != 0 > true).

After the Sonos switch, you see a switch (the upper yellow one) which only sends the message when its false. That sets the gauge to 0 when the system is turned off using the switch.

Remember volume level
I made two switches, one after the gauge and one after the switch. The one after the gauge only sends the message when it’s not zero. This to prevent that the variable which needs to remember the volume level goes to zero when the system is turned off.

This switch then goes to the function below, which receives the message and sets a variable (var = volume) to this payload. The function only executes this part when the payload is not true. I tried to Javascript this:
if(msg.payload != true){ var volume = msg.payload; }

The other switch sends the message true to the function, in order to prevent that the on/off switch triggers the function when it’s turned off. So the function only receives a number somewhere in the range of 1-100 and the payload true. Now I want the function to send to value of the variable (volume) to the gauge. I tried to Javascript my way trough this again:
if (msg.payload = true){ msg.payload = volume; return msg; }

But I can’t get it right. I think it’s somewhere in the last piece of the function. I tried debugging, but I couldn’t figure it out. can anyone assist me?

You can store the volume in a global variable:
global.set("volume",80);

And read the variable:
var volume=global.get("volume") || 0;
(The “|| 0;” creates and sets the variable to 0 if it does not exist yet

If you need this variable only on the current page, you can replace “global” with “flow”
example:
flow.set("volume",80);

Thank you. It took some trail and error, but I managed to make it work with your help!

Hi @M_a_r_c_o,
Thanks! Had to dig around a bit because it did not work immediately. I used this one: http:// doorbird ip address/bha-api/video.cgi?http-user=username&http-password=password
Before I got this working I used an iframe, it was nice but you have to put in your username and password all the time so that is not user friendly.
I still need to add one Foscam camera and another (nameless) one. I did not succeed yet.

@Satoer, For the voordeur (and others) icons, did you use a switch? The one with the lock. I used that but I don’t like it that I can switch it. It should only switch by the system. And the buttons you have made (for example the “slapen”) do they reflect the state they are in?

greetings.

@Satoer How did you get the outside temperature. Do you have a device connected to Homey for this or do you use a webbased weather service? Something like Darksky.

Yes it’s a switch with custom icons (you choose hundreds of Font-awesome icons, just see the help docker)


Just check “Switch shows state of the input” than you can’t change it by clicking.

The other buttons like “Slapen” do not reflect any state their in. They just activate flows in Homey. But I think it possible to to reflect the state their in. I believe you can embed the payload in every edit-box if you want. So you can change colours or icons based on a state. (Haven’t tried this though).

I believe there are numerous weather service nodes that you can install. But I just use an Aqara Zigbee temperature / humidity sensor outside.

Anyone tested this Node-RED library since MQTT Hub is supporting Homie convention https://flows.nodered.org/node/node-red-contrib-homie-convention

I am trying to make a button instead of a switch. I think it looks nicer. I have made something with the help from someone on the Node Red forum but I can’t seem to make it work all the way…
The button switches now from on to off when I control my light through homey. When I want to control it through the NR dashboard it only switches on.
My intention was to make it work and share it here but it looks like I need some help :relaxed:
Can someone here have a look?

[{"id":"12bc164d.44fefa","type":"ui_button","z":"e185900c.bdc37","name":"on/off test1","group":"c09ef81b.346968","order":5,"width":6,"height":1,"passthru":false,"label":"{{msg.topic}}","tooltip":"","color":"","bgcolor":"{{msg.background}}","icon":"","payload":"lightstate","payloadType":"global","topic":"homie/homey-topic/gang-beneden/onoff/set","x":770,"y":1200,"wires":[["512a9b9.572d264"]]},{"id":"512a9b9.572d264","type":"function","z":"e185900c.bdc37","name":"buttonHandler","func":"//this function runs when you are pressing the button.\n\n// read current state of light\nvar state = global.get(\"lightstate\") || false;\n\nvar label;\nvar color;\n\nif(state === true){\n  // current state is true (light is on) lets turn it off \n    label = \"OFF\";\n    color = \"red\";\n}\nelse {\n    // current state is false (light is off) lets turn it on \n    label = \"ON\";\n    color = \"green\";\n}\n\n// buttonstate is message, which goes straight back to button. It disables button. \n// button stays disabled until MQTT message comes in and tells to node-red \n// what is actual state of that light\nvar buttonstate = {enabled:false, background:color, topic:label};\n\n\n// I dont know anything about your mqtt commands\n// usually the commands are created by using msg topic for device select and and msg payload for command\n// Find info about it from your device documentation \n// if the command onoff/set does the toggle action, then it may work\n// but if not, then you must create the command with correct action (on or off)\n\nmsg.payload = \"true\"\n\nreturn [buttonstate,msg];","outputs":"2","noerr":0,"x":890,"y":1260,"wires":[["12bc164d.44fefa"],["326f19bd.0bee86","df991750.4f1028"]],"inputLabels":["input"],"outputLabels":["to button","to proccessing"]},{"id":"efdd2bf0.f76278","type":"function","z":"e185900c.bdc37","name":"determineButtonState","func":"// this function runs every time the MQTT message is arrived (previous node changed the state of light).\n// read the state (if not set somehow, let assume it is false)\nvar state = global.get(\"lightstate\") || false;\nvar label;\nvar color;\n\nif(state === true){\n// state is true (lets make button green)\n label = \"ON\";\n color = \"green\";\n}\nelse{\n    // state is false (lets make button red)\n label = \"OFF\";\n color = \"red\";\n}\n\n// send out message to button, this outgoing message only changes button visuals\nmsg = {enabled:true, topic:label, background:color};\nreturn msg;","outputs":1,"noerr":0,"x":540,"y":1180,"wires":[["12bc164d.44fefa"]]},{"id":"57fd577b.0d4378","type":"mqtt in","z":"e185900c.bdc37","name":"MQTT receiver","topic":"homie/homey-topic/gang-beneden/onoff","qos":"2","datatype":"auto","broker":"ff171d3b.1cac1","x":80,"y":1300,"wires":[["bb8d1607.9edff8"]]},{"id":"bb8d1607.9edff8","type":"function","z":"e185900c.bdc37","name":"store the state of light","func":"// read current state of light \nvar lightstate = global.get(\"lightstate\") || undefined\nif(msg.payload === \"true\"){\n   lightstate = true\n}\nelse{\n   lightstate = false \n}\n// write state to global context, so we can read it where ever the state is needed\nglobal.set(\"lightstate\",lightstate)\n\n\n// return last known state (we dont use it but the flow must continue)\nmsg.payload = lightstate\nmsg.topic = \"state-of-light-changed\"\nreturn msg;","outputs":1,"noerr":0,"x":350,"y":1300,"wires":[["efdd2bf0.f76278","45e16198.c0745"]]},{"id":"326f19bd.0bee86","type":"mqtt out","z":"e185900c.bdc37","name":"MQTT Light transmit","topic":"","qos":"","retain":"","broker":"ff171d3b.1cac1","x":1140,"y":1340,"wires":[]},{"id":"45e16198.c0745","type":"debug","z":"e185900c.bdc37","name":"FROM MQTT","active":true,"tosidebar":true,"console":false,"tostatus":false,"complete":"true","targetType":"full","x":750,"y":1360,"wires":[]},{"id":"df991750.4f1028","type":"debug","z":"e185900c.bdc37","name":"TO MQTT","active":true,"tosidebar":true,"console":false,"tostatus":false,"complete":"true","targetType":"full","x":1080,"y":1260,"wires":[]},{"id":"c09ef81b.346968","type":"ui_group","z":"","name":"Test tab","tab":"d8ed3d29.d7b81","disp":true,"width":"6","collapse":false},{"id":"ff171d3b.1cac1","type":"mqtt-broker","z":"","name":"Homey MQTT","broker":"192.168.1.22","port":"1883","clientid":"","usetls":false,"compatmode":true,"keepalive":"60","cleansession":true,"birthTopic":"","birthQos":"0","birthPayload":"","closeTopic":"","closeQos":"0","closePayload":"","willTopic":"","willQos":"0","willPayload":""},{"id":"d8ed3d29.d7b81","type":"ui_tab","z":"","name":"Testing","icon":"dashboard","order":3,"disabled":false,"hidden":false}]

Hello @Satoer

This idea with Nodred is GREAT !!!

I wanted to ask you a question,

What screen do you use for the board?

Thank you very much and great work !!!

I think you made it way too complicated. I’ve adjusted your example:

First you receive the MQTT light message.

Than you store the state of light in a global, or in my case I changed to a flow variable (flow variables only exist on the flow page, if you don’t need it global I suggest you don’t use it global)

var lightstate = flow.get("lightstate") || undefined;
var label;
var color;
    if(msg.payload === "true"){
      // state is true (lets make button green)
       label = "ON";
       color = "green";
       lightstate = true;
    }
    else{
        // state is false (lets make button red)
       label = "OFF";
       color = "red";
       lightstate = false;
    }

    flow.set("lightstate",lightstate);
    msg = {enabled:true, topic:label, background:color};
    return msg;

This the only thing you need to set the color for the switch. If you switch the button, the outgoing MQTT message will return from homey setting the color to the right color (on / off).

Feed this into the switch.

Output the switch to this piece of script:

//this function runs when you are pressing the button.
// read current state of light
var lightstate = flow.get("lightstate") || false;

//Payload is NOT (!) the lightstate. inverts the boolean (true / false)
msg.payload =  !lightstate;

return msg;

And output that to the MQTT handler.

Full Json (Remember to select your own Homey MQTT server and topic!)

[{"id":"3d6f3a0c.eedda6","type":"ui_button","z":"48744450.148de4","name":"on/off test1","group":"bec4a4a3.5c9928","order":5,"width":6,"height":1,"passthru":false,"label":"{{msg.topic}}","tooltip":"","color":"","bgcolor":"{{msg.background}}","icon":"","payload":"lightstate","payloadType":"global","topic":"homie/homey-topic/binnenring/onoff/set","x":630,"y":1360,"wires":[["37ff796.3faf406"]]},{"id":"37ff796.3faf406","type":"function","z":"48744450.148de4","name":"Toggle On / Off","func":"//this function runs when you are pressing the button.\n// read current state of light\nvar lightstate = flow.get(\"lightstate\") || false;\n\n//Payload is NOT (!) the lightstate. inverts the boolean (true / false)\nmsg.payload = !lightstate;\n\nreturn msg;","outputs":1,"noerr":0,"x":840,"y":1360,"wires":[["1b5eb5fe.366b72"]],"inputLabels":["input"],"outputLabels":["to button"]},{"id":"83ca39da.0824f","type":"mqtt in","z":"48744450.148de4","name":"MQTT receiver","topic":"homie/homey-topic/binnenring/onoff","qos":"2","datatype":"auto","broker":"d776df12.63afa","x":160,"y":1360,"wires":[["8236aac3.d4838"]]},{"id":"8236aac3.d4838","type":"function","z":"48744450.148de4","name":"store the state of light","func":"var lightstate = flow.get(\"lightstate\") || undefined;\nvar label;\nvar color;\n\nif(msg.payload === \"true\"){\n// state is true (lets make button green)\n label = \"ON\";\n color = \"green\";\n lightstate = true;\n}\nelse{\n // state is false (lets make button red)\n label = \"OFF\";\n color = \"red\";\n lightstate = false;\n}\n\nflow.set(\"lightstate\",lightstate);\nmsg = {enabled:true, topic:label, background:color};\nreturn msg;","outputs":1,"noerr":0,"x":400,"y":1360,"wires":[["3d6f3a0c.eedda6"]]},{"id":"1b5eb5fe.366b72","type":"mqtt out","z":"48744450.148de4","name":"MQTT Light transmit","topic":"","qos":"","retain":"","broker":"d776df12.63afa","x":1080,"y":1360,"wires":[]},{"id":"bec4a4a3.5c9928","type":"ui_group","z":"","name":"test","tab":"c63b7d19.a7f4f","disp":true,"width":"6","collapse":false},{"id":"d776df12.63afa","type":"mqtt-broker","z":"","name":"Homey MQTT","broker":"192.168.178.26","port":"1883","clientid":"","usetls":false,"compatmode":true,"keepalive":"60","cleansession":true,"birthTopic":"","birthQos":"0","birthPayload":"","closeTopic":"","closeQos":"0","closePayload":"","willTopic":"","willQos":"0","willPayload":""},{"id":"c63b7d19.a7f4f","type":"ui_tab","z":"","name":"Homey Dashboard 2","icon":"dashboard","order":2,"disabled":false,"hidden":false}]

1 Like

I’ve modded an old iPad 2 (not the Air 2) and put it inside the wall (It’s actually a really large hatch, the back of the wall is accessible).


Used an esp 8266 with Homeyduino to wake up the screen with homey (based on a motion sensor) when someone is in the room. A simpler solution is to do this wireless with Bluetooth (But the iPad 2 ios 9 does not support BLE, so I couldn’t use it for that).

Made a tutorial for Bluetooth solution:
https://community.homey.app/t/homey-esp32-bluetooth-keyboard-firmware-can-lock-unlock-ipad-remotely-dev-review-needed

5 Likes

What a great job @Satoer !!!

Just a question from my ignorance.

The graphic control board, do you launch it through the ipad web browser connected to the same network as homey?

Thank you very much in advance

I use this one, Samsung QB13R (wifi), integrated in wall, with no access from behind! It has remote and a touch-panel version (T)

1 Like

Thanks @Tangodelta!!!

Samsung’s screen is very cool. I guess how to enter you choose web browser.

Is that right?

Thanks!!!

Yes, I use the web browser, it enters full screen automatic, with preconfigured ip-adress! Have 7, one for every room in the house, with a dedicated node red page for each, and in addition one in the hallway for general information like weather and forecast, energy use and basement info! Can recommend these screens!

Hi @Satoer, Ofcourse I made it to complicated! :rofl: Thanks for this and also for taking the time to explain it. I tried so many different things but I could not get it to work.

greetings

My dash so far… And I’m proud of it😊

4 Likes

A question.

How could you put the size of the largest date without changing the rest of the texts?

Thanks!!!

i’m not sure what you mean. The date and the time are two separate fields en therefore u can give them seperate sizes of text.

1 Like