Node Red: A widget based dashboard working with Homey trough MQTT

Hi Everybody,

This is the first version of my dashboard. Work still in progress but happy with the result so far.

Setup:

  • Homey Pro, MQTT Hub and MQTT client on Homey, MQTT Broker and Node Red on a Raspberry Pi4.
  • Used old iPad2 with Kiosk app as screen. All running in an isolated vlan.
  • Made iPad bracket myself from wood and aluminum profiles. To avoid battery issues: power is only on for 2 hrs every 8 hrs , controlled by Homey :grinning:
  • Tried to make dashboard so that you can see the status from a distance. Green is “all ok” and red is something to pay attention to. If you want more info you need to look closer;

Still to do:

  • Include snapshots or stream of IP camera(‘s). Didn’t figure out how to do this yet;
  • Add Heimdall (security stuff , status etc);
  • Better alignment of buttons, graphs and text. I need to get better understanding of the use of CSS to avoid waste of white space and ugly text alignment.
  • Something clickable with pop-up to save space (e.g. show camera snapshot of frontdoor when clicked on frontdoor movement or more detailed wheather forecast when clicked on small version etc);
  • Nicer looking dimmer button (make one button, including slider)
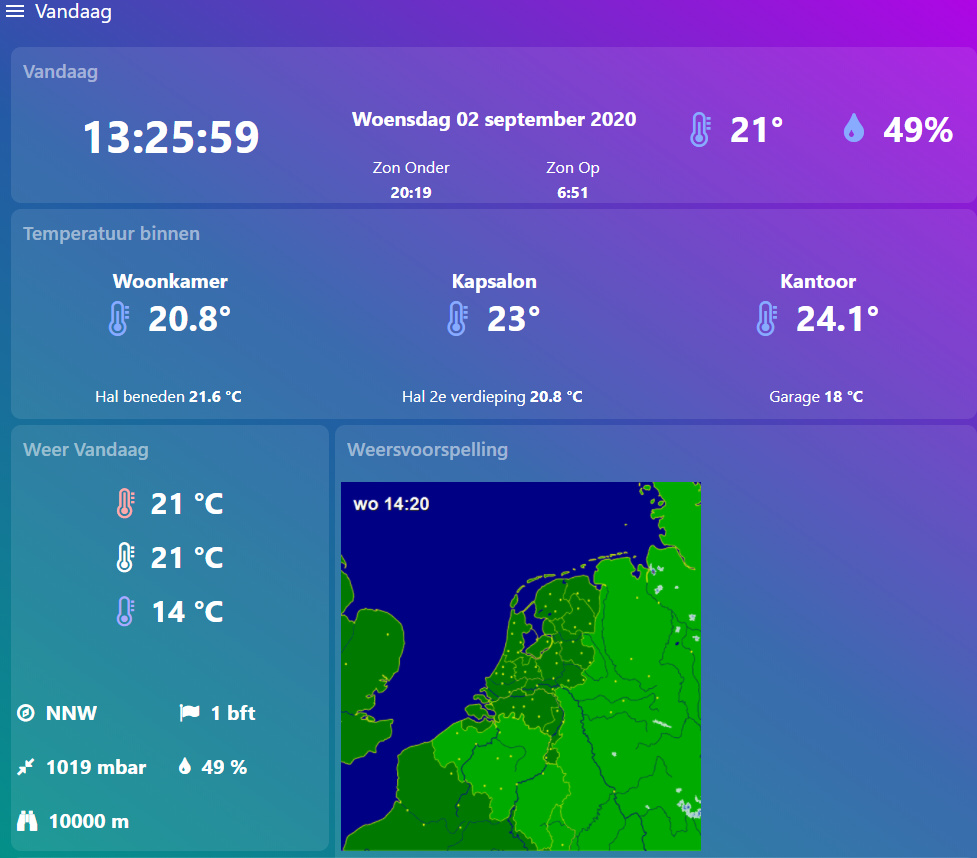
  • Make use of dark and light theme. Dark looks better I think but requires some additional styling which I do not know how to do yet;
  • Improve stability. After reboot of Homey+apps and/or adding devices things are not always fully synchronized (in Homey and on dashboard). Takes a few on/off cycles to get in sync it seems. Feels like Homey needs to set the status once before I can use the dashboard. In general the whole system feels less robust than before the implementation of MQTT\node red.
  • Turn dashboard screen on/off based on motion (but do not have the space to implement the Bluetooth solution Satoer made)
  • Whatever can be added and/or improved…
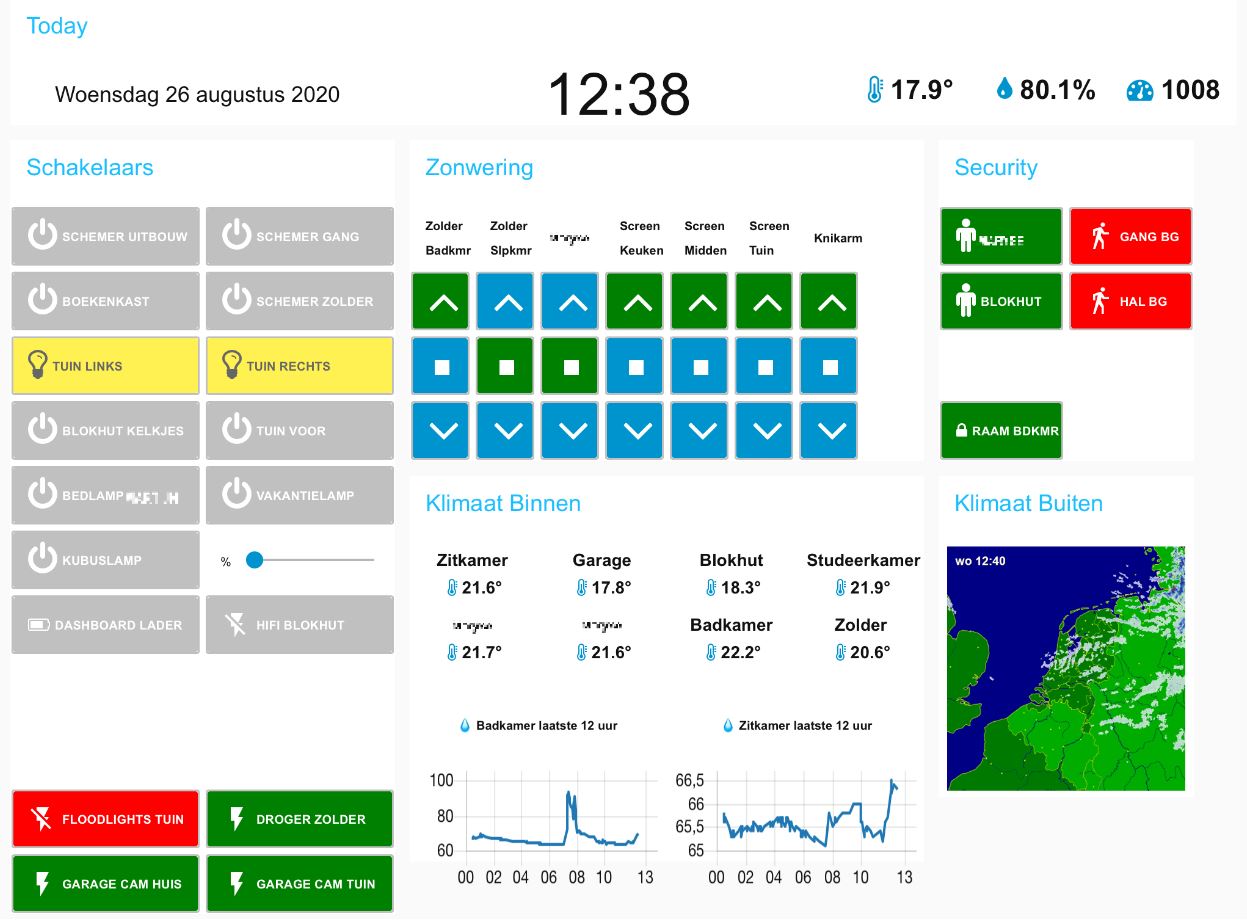
 :nerd_face:

General look:

Dashboard Standard Status:

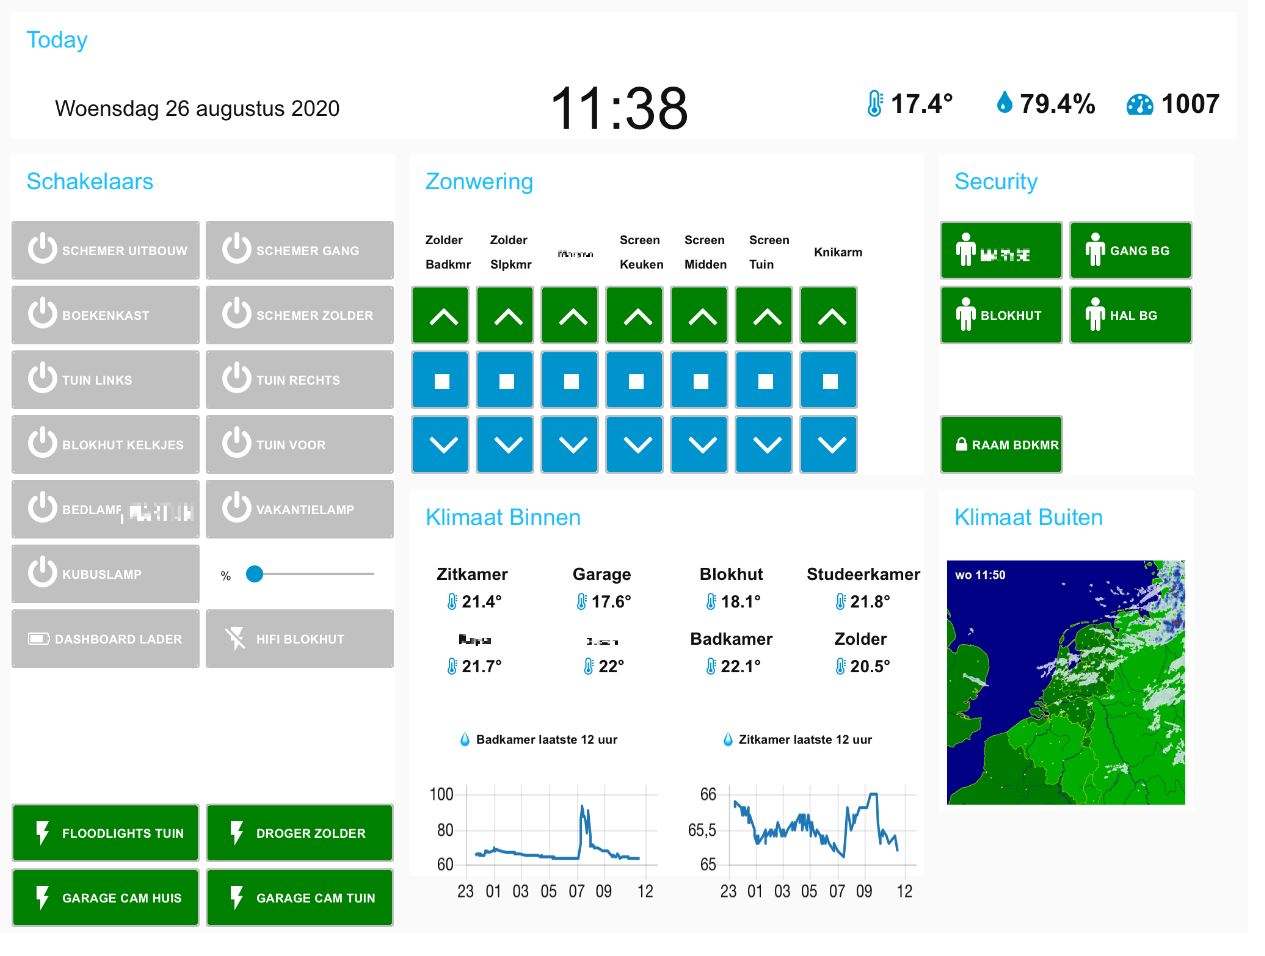
Dashboard with some activity:

6 Likes

Take a look at this post:

But in my experience this works only in Safari and probably not in a kiosk browser (tested several). Somehow third party apps aren’t allowed to embed passwords in the URL or something.

The Bluetooth (esp32) solution does not work for an old iPad2. You need BLE for that and the old iPad 2 does not support that. I soldered wires directly to the magnetic hall sensor to wake the tablet with a wemos D1 / homeyduino. But I do not recommend it. It requires to open the iPad and that’s a real nightmare (I needed to replace the connector socket anyway).

Thanks for the info!
I’m almost there. I hope…

Steps taken:

  • Finally found a working url for getting my Dahua cam snapshot: http://user:password@ipadres:port/cgi-bin/snapshot.cgi?
  • Entering this url in browser gave a nice snapshot without getting a separate login pop up
  • Putting the url via a function node as payload into a template node make a dashboard picture.
  • Tested it on my day-to-day iPAD: works fine. Weird enough running the same dashboard on Edge or Chrome on my PC doesn’t work. No snapshot pictures at all. But as long as it works on an iPAD I am happy.
  • Created firewall rules to make sure that my (old) dashboard iPAD in the IOT VLAN could talk to the Dahua IP-cam in de camera VLAN.
  • Entering the above url in a safari browser session on the (old) dashboard iPAD also gives a nice snapshot (after clicking a warning on malicious websites away). So network/firewalling should be ok now;
  • But… no picture in the dashboard on my dashboard iPAD. :face_with_raised_eyebrow:

A far as I can see the version of the Kiosk app I use is also the same, so I am a bit lost on what the issue could be. Any suggestions?

Some evidence.

Works on day-to-day iPAD (in Kiosk app!)

nieuwe ipad werkt

But doesn’t work on old Dashboard iPAD (in same Kiosk app)

and doesn’t work on dashboard in browser:

Browser werkt niet

Hi @Satoer,

Sorry if this answer was already given, but how did you manage to open an extra panel to choose the light color? I am building a dashoard too but I am running short on space due to the size of my old iPad2. I really like the idea of an extra panel to show more detail or extra options.

I’ve already tried to open a new page, but this works rather slow. Probably also due to the old iPad2.

N00B here. I have a nice CSS for the background mimicking homey. However, every time I use the UI template node, I get a black background colour which I cannot seem to get changed.
Any help is appreciated. See the screenshot here:


The source code I tried is this:

<p style="text-align: center; background-color: rgba(1,1,1, 0.5);">Woonkamer</p>
<p style="font-size:35px; text-align: left; font-weight: bold; background-color: rgba(1,1,1, 0); " >&nbsp;<i style="color:#0094CE!important;" class="fa fa-thermometer-three-quarters" aria-hidden="true"></i>{{msg.payload}}&deg;</p> 

I need transparent background really… Pulling my hair… :frowning:

@RogerSt Did you by any chance take a look at the CSS in this post?

1 Like

Yup - still struggling. CSS is not my cup of tea I guess…

CSS n00b here too, but I used the CSS from the post I mentioned before. No probs at all. The transparent background is already in it.

The temps are placed in a UI template node same as you did. Did not use any extra styling:

<table border="0" style="width: 100%;">
<tbody>
	<tr>
		<td style="width: 25.0000%;"><span style="vertical-align:middle; font-family: Arial,Helvetica,sans-serif; font-size:15px; color: rgb(255, 255, 255);"><span class="fr-class-transparency">&nbsp;&nbsp;Woonkamer:</span></span>
<span style="vertical-align:middle; font-family: Arial,Helvetica,sans-serif; font-size:20px; color: rgb(255, 255, 255);"><BR>&nbsp;&nbsp;{{msg.payload["homie/homey-topic/thermostat/woonkamer/measure-temperature"]}}&deg;</span>
			<br>
		</td>
		...
	</tr>
</tbody>

Would be interested in understanding how to create the large cloud icons depending on weather conditions.
If you have some time, thanks!

Thanks!! @Joenoo, this really helped:

Still work in progress but it looks nice enough for me. Now I still need to figure out how to create weather dependent icons like sunshine cloudy, rain etc.

Hi @MFM_Bart, how did you get the week forecast image? Can you please share your URL?

Hi,

import this and you have it.

[{“id”:“772c8687.22f798”,“type”:“inject”,“z”:“a95ec7f3.3a81e8”,“name”:"",“topic”:"",“payload”:"",“payloadType”:“date”,“repeat”:“60”,“crontab”:"",“once”:true,“onceDelay”:0.1,“x”:90,“y”:120,“wires”:[[“84be3435.bf522”,“46890e59.0b9e9”]]},{“id”:“84be3435.bf522”,“type”:“function”,“z”:“a95ec7f3.3a81e8”,“name”:"",“func”:“d = new Date().getTime()\no = “”\nreturn {template:o};”,“outputs”:1,“noerr”:0,“x”:230,“y”:160,“wires”:[[“946cffb5.105f18”]]},{“id”:“946cffb5.105f18”,“type”:“ui_template”,“z”:“a95ec7f3.3a81e8”,“group”:“4d8e4022.a6059”,“name”:“Buienradar weersvoorspelling “,“order”:2,“width”:“4”,“height”:“4”,“format”:””,“storeOutMessages”:true,“fwdInMessages”:true,“templateScope”:“local”,“x”:450,“y”:180,“wires”:[[“6ffcd8db.c29bd8”]]},{“id”:“6ffcd8db.c29bd8”,“type”:“debug”,“z”:“a95ec7f3.3a81e8”,“name”:"",“active”:true,“tosidebar”:true,“console”:false,“tostatus”:false,“complete”:“true”,“x”:650,“y”:180,“wires”:},{“id”:“4d8e4022.a6059”,“type”:“ui_group”,“z”:"",“name”:“Weer”,“tab”:“e2581a51.3f011”,“order”:1,“disp”:true,“width”:“7”,“collapse”:false},{“id”:“e2581a51.3f011”,“type”:“ui_tab”,“z”:"",“name”:“Het weer”,“icon”:“dashboard”,“order”:3,“disabled”:false,“hidden”:false}]

1 Like

Please also check this page: https://www.buienradar.nl/overbuienradar/gratis-weerdata
Near the bottom of this webpage you can see which URL you can select. You can select the forecast of a weather station “near” your home.

Hi,
After replacing all ‘smart quotes’ with ‘dumb quotes’, I still keep 1 error while importing and I have no clue how to solve… :frowning: sorry… almost there I know, but still looking for a bit of help…
image

Hi Marius,

N00B here - so ignorance warning… only using node red since a week now.

The simplest way I believe at present, is by creating separate tabs and giving each user their own tab.

Or…? Did you find another solution to your enquiry?

;\nreturn looks strange for me, (not a programmer) try return

\n is a regular newline. That is not the issue. But thanks for thinking with me!!!

replacing the o=""; with o=\"\"; should do the trick

excellent!!! Thanks

Hello, A fews weeks I had my dashboard working.
Now the MQTT receiver is nog connecting

Again I followed your tutorial. I can’t get it working.

Please advise where to look