How to structure your flows

Posted in the flow category. Although it does not match the flow category definition, I thought this was the best place…

I would like to share my view on structuring flows. Hope its usefull for others

You will find that, in time, with more devices and sensors, flows become more complex and will cause entanglements.

This post is not about how to build a flow. But a way too keep your flows readable, less entangled and easy to understand.

If this does not work for you, other users have other approaches. See what works best for you.

So, here we go:

23 Likes

How to structure your flows: using folders

  • A folder “settings” contains all Trigger flows based on time (tag: @)

  • I create a folder for every zone and keep the related flows there. Since I have a lot of flows I created subfolders: settings, trigger ON, trigger OFF per zone folder

** Action flows (tag: >) are in the folder that refers to the zone where the action takes place.

** Trigger flows from sensors (tag: !) are in the (sub)folder that refers to the zone the sensor is in.

** Scene flows (tag: #) are in the folder that refers to the zone the scene is build for (build a scene per zone)

6 Likes

How to structure flows: keep flows simple

After working a lot with flows I currently have the habit of splitting up my flows.

My personal motto is: more flows is not bad!

I use A few “types” of flows and try not mix these types in one flow (explained in more detail below)

I also use a “tag” in the naming of the flow, so I can easily recognize the type (inspired by @AcE_Krystal a few years ago)
Update: or use icons as described by @Ploegske in the responses below

My flow types:

  • Trigger flow: a flow triggered by a time event (tag: @ or :clock1:) or a sensor (tag: **!**or :vibration_mode:)

Examples for naming: @ 06:50 get out of bed, :stopwatch: dinertime, ! Lux kitchen, :vibration_mode: PIR kitchen

WHEN typically contains a trigger like time or sensors like motion, temp, etc.

THEN typically contains a card from the flow section: “start flow” / “enable flow” / “disable flow” or change the status of a virtual devices.

THEN typically does not contain cards for actual devices (lights, plugs etc).

Time triggered flows (tag: @/:stopwatch:) will often have multiple cards in the THEN

  • Action flow: flow that starts an action (Tag: > or :rocket:)

Examples for naming: > Radio ON, :rocket: lights living OFF

WHEN typically contains a card “when this flow is started” or a virtual device status change

THEN contains an action: switching devices or starting a scene flow (explained below)

  • Scene flow: flow that defines a “scene” or “mode” (tag: # or :bulb:)

Examples of naming: :bulb: kitchen bright, # movie time light living, # Alarm armed modus, # Holiday modus

WHEN contains a “when this flow is started” or a virtual device button (not a switch!)

THEN contains settings for a group of devices, lights etc in a specific zone

Keep scene flows specific to one zone that makes it easier to use them in multiple flows.

8 Likes

How to structure your flows: using virtual devices

I use virtual devices (button not switch!) to start my action (tag: >) and scene (tag: #) flows. I prefer it over using “when this flow is started”

  1. Virtual devices show in which flow they are used. It makes it easier to track in which flow actions and scenes are used

  2. Using virtual devices makes it easier to create new flows triggered by events.

Examples

Trigger flow that starts my day, but not every day start at the same time…

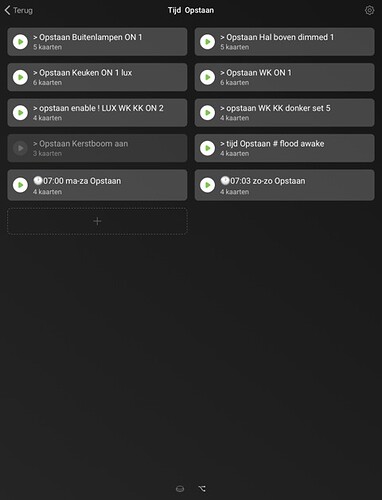
It triggers a virtual device (button not a switch!). This device is used to trigger the action flows. Remember, I keep my time trigger flows together in one folder “settings”

This is the virtual button showing the flows its triggering:

image

I trigger the same button at different times
image
Sleeping in on sundays…
image

how to structure your flows: grouping of sensors
In some cases you will have multiple sensors that should control the same action (scene).
Homey only allows one card in the IF sextion. That would mean you need to create the same flow for every sensor.

Another advantage of grouping is: if you ever need to exchange a sensor you do not need to update your flows! Just make sure at least one sensor stays in the group. Add the new sensor and then remove the old one. And you are done

But there is a nice solution for it: grouping of sensors.

Motion sensors: this is supported by athom via the “zone activity”. In the IF section select zone & devices, select the zone that your motion sensors are in
image

Select the desired action
image

Other sensors (temperature, lux etc):
Install the group app. This app allows you to group sensors and provides card to put in the flows
IF cards:
image
Action for the IF cards
image

2 Likes

The trigger flows:

image image

3 Likes
  • The action flow:

Action flow, tiggered by the virtual device from the trigger flow.
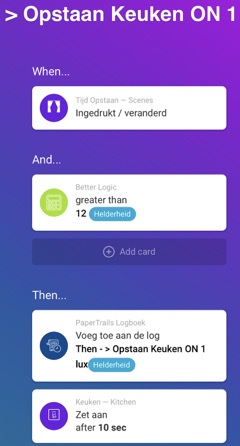
It turns on the lights in the livingroom (unless it is light). The same trigger is used to switch on the light in the kitchen and the hallway, notice these are separate flows for every zone. I could have added kitchen and livingroom in one flow. But it would have been much harder to also build in the darkness check.

image image|240x4w5
image image
image image
image image

image

image
image
image
image

3 Likes

The kitchen lighting is a virtual device too, but in this case a switch. This way homey knows if the lights are switched on. I use this status in other flows (ea motion triggered in the garden switches the lights on and off. But the kitchen should not go off when they are turned on)

Also notice I have 2 virtual devices (switch) that represent a status. Based on the a scene is selected. (During cleaning and diner the light should be more bright

image

image

image

3 Likes
  • the scenes flow
    These flows actualy set the light to a desired setting

image

image

image

2 Likes

Yes it is a lot of flows. But homey is not bothered by a lot of flows. And the flows are simple, no complex AND / OR.

Advantage:

  • You can easily change your dayly routines. Just change the time trigger in this one flow and all the rest is unchanged.

  • Its easier to group flows in folders named after the zones in the flow section. Makes it easy to find flows

  • it makes adding a flow easier: When I create a new flow that should start when I go to bed. I only need to create that flow. No need to also update the trigger flow that starts at bedtime with a “start a flow card”

  • it makes you more flexible: bedtime can be different per day. So I will have multiple trigger flows for time (tag: @). When I use “start a flow”, in case of creating a new flow I would need to add that flow to every trigger flow defining bedtime.

  • Easily trigger multiple action flows with one trigger. Without the flows becoming complex. The living, kitchen and hall are nicely separated.

  • Because flows are split, you can use the AND column in both flows. This gives more options and makes it better readable, less complex. As you see in the flows, every room has its own lux measurement in the AND, All triggered by one timer flow.

If I want the coffeemachine to heat up, I just create an extra flow with the same virtaul device as a trigger

If I want the kitchen lights to turn on later… I just change the WHEN to an other virtual device that is linked to a different time trigger.

2 Likes

How to structure flows: reduce number of flows by using variables
Sometimes exactly the same flows are used, only with different values. Just to set different situation/scenes
You can simplify this by using variables and just one basic flow.

Example:

  • the lights in my kitchen are controlled by a lux measurement.
  • but I have different situation,these require different lux to trigger: at dinner I want the light to go on a little sooner. During cleaning I really want more light, so the lights should stay on even longer

What did is:
I have one flow triggering the lights based on lux measurement.
“KK is donker lux” is the variable controlling the switching
“Helderheid” is the homey tag for the lux measurement of the hue motion sensor
image
image
image

In logic I created several variables that I use only to define lux Pre-sets (desired lux levels for switching)
(You can use a value in the flow instead of these presets, but I prefer to use variables because these are easier to update and can be re-used in other flows)
image

Now I can control the lux level that the light switch on.
What I do is set the value of the variable “KK is donker lux” with logic command to one of the predefined values.
So during the day I change the value “KK is donker lux”
When I get up:
image
image

When diner starts:
image
image

Notice: I am using the virtual devices to trigger flows as described above…

How to structure flows: prepare your flows for debugging

Bugs and strange behaviour, it will always happen.
So you better be prepared…
Structuring your flows makes it easier to find bugs, but you need a start for your bug search

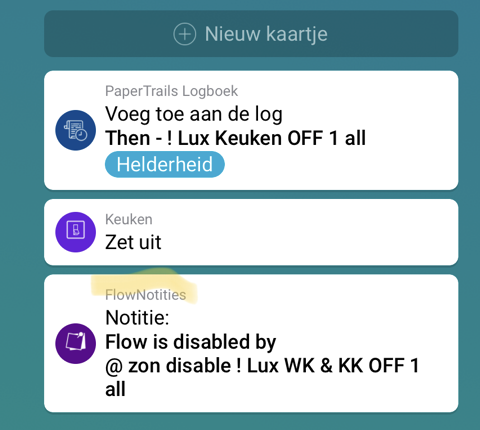
  1. Make sure every THEN section in your flows has a logging point
  2. If you use an AND also make sure to add a logging point in the ELSE section. Especially if your Else section does not have any cards! (How else can you determine if the flow triggered and hit the Else or did not trigger at all)
  3. If you add a (long) delay, make sure to also add a logging point with that same delay. (After 1hr switch off the light, how will you ever trace that one if you do not log)
  1. In case of bugs, run flow viewer
  2. Use the web browser to print to pdf
  3. Open the file in a pdf viewer that support searching
  4. Now you can search for the logging text or a device

How to structure flows: Add comments to your flows
Splitting up flows can also be confusing sometimes.
For better understand and for refernece you can add comment to a flow.

I created an app that allows you to add comment.
Find the app description here
And the app here

image

Thanks for this guide. I have not yet found a system I am happy with, so will definitely consider this when I decide to reorganize my 150 flows for the 4th time.

I use almost an identical structure. it does, however, require some discipline. Some flows are fairly simple (if movement, then switch con one light) so it is tempting to just make one flow for it. Instead, the structure requires to cut up also these simple flows in two. Feels a bit like adding complexity, but it does help a lot in circumstances where unintentional or unforseen actions happen that could be triggered by several trigger-events. In these cases It took less time to identify the responsible trigger and tweak it.

3 Likes

I added another section with new tips atthe top…:

I lost you a bit at the logic part. What did you do with all the different values?
I like your flow attitude. I’ll see how I’ll work with it :slight_smile:

1 Like

Thanks for your feedback.
I tried to clarify it a bit (old text in italic)

Some flows are copied to set different situation/scenes.

Sometimes exactly the same flows are used, only with different values. Just to set different situation/scenes

Added:
“Helderheid” is the homey tag for the lux measurement of the hue motion sensor

In logic I created several lux settings:

In logic I created several variables that I use only to define lux Pre-sets (desired lux levels for switching)

(You can use the value in the flow instead of these presets, but I prefer to use variables because these are easier to update and can be re-used in other flows)

Now I can control the lux level that the light switch on.

  • What I do is change the value of the variable “KK is donker lux” with logic command.*

So during the day I change the that value:

Now I can control the lux level that the light switch on.

What I do is set the value of the variable “KK is donker lux” with logic command to one of the predefined values.

So during the day I change the value “KK is donker lux”

aaah, KK is donker is the minimum value when the lights don’t need to turn on.
After that they turn on, I see. And at different moments (opstaan 9wakeup) etc you set a different required “helderheid” from the motion sensor? Right?

How would you turn on " eten"’ eg?

That is correct. And I change this value based on the situation.
The cleaninglady needs more light so I change the value to turn the lights on earlier

Nope, “helderheid” is the value that is measured by the motionsensor (tag).
This value is compared to “KK is donker”

The value “KK is donker” is changed at different moments during the day, matching the need.

ah, checked.
And the need changes via one of the buttons or voice commands, or time of day right?