Hi Peter
Thanks. I will have to look at the ESPHome ![]()
Hi Peter
Thanks. I will have to look at the ESPHome ![]()
Hello, I do not know if it’s possible, but no, I’m not planning to check it out.
I’m actually planning to move to another automation solution … because I have over 30 Zigbee devices and Zigbee + Homey == Headheck
The project is on github, anyone willing to take it over, or participate is welcome ![]()
There is how I do :
Install python : Download Python | Python.org
=> Don’t forget to check the option to add python to path
Open a terminal : cmd.exe
Create esphome directory : mkdir esphome
Go inside that directory : cd esphome
Install esphome:
python -m pip install wheel
python -m pip install esphome
Check if it works by typing python -m esphome
Prepare the confioguration file of your device :
mkdir myconfig
python -m esphome wizard myconfig<device_name>.yml
Edit the configuration file and add the required components :
notepad myconfig<device_name>.yml
You can then compile the configuration file :
python -m esphome compile myconfig<device_name>.yml
The binary files are created into : myconfig.esphome\build<device_name>.pioenvs<device_name>
There are 3 binary files (see below) :
esphome_2023.7.0-dev_cb3s_bk7231n_lt1.1.0.uf2
firmware.bin
firmware.uf2
For first time (wired), use the command : python -m esphome upload myconfig<device_name>.yml
It will choose the correct file (or should …)
For OTA, connect to the device web interface and upload the file firmware.uf2
That’s fine. I ended up using Frigate to connect the cameras to and then att that to Homey. Got motion detection and recording as well then.
I don’t have the time right now to imherit a project, but at some point maybe.
Hi Baldor
Thank you very much for your description.
I have now done as described and everything has gone well, and the file is now read over to my board.
Sorry for my newbie understanding. But what now? What should I do after the file has been read onto my board, what is the next step?
I tried to see if Homey could find the board via the Homeyduino app, but it couldn’t.
Sorry that I’m not on board with what the next action is, but it’s probably also because I haven’t fully understood what happened exactly in all the steps you described and that I’ve gone through ![]()
And in which program should I use to set up the board itself with sensor and outputs/inputs?
Damn, I feel stupid right now, but I’ll learn along the way.
Best regards Michael
What was your plan with it, Michael?
And did you find a matching script to install?
Did you install my example script?
Hi Peter
Thank you for writing
So far I have done as Baldor has described and this is where I am now. I have watched a few videos on Youtube and have become a bit wiser now.
Now I would like to install the ESPhome Dashboard, but I can’t quite figure it out, when I press the link here nothing further happens.
Am I to understand that I also have to install Home Assistant first?
Sorry, but I’m a bit around the floor
-Michael
No problem, Michael.
The file, myconfig<device_name>.yml?
When you were able to install that file to the board per USB, can you reach the board now by browsing to it’s IP address?
You can find the IP address in your router’s DHCP table, or by an app like Fing (Android)
Like Baldhor wrote, you’ll need to upload another file:
.
No. Just ESPhome.
I prefer the GUI provided by a local web server;
To do so, on my linux laptop, I run these two commands below, after following the install guide I posted earlier, and then following this guide:
https://esphome.io/guides/getting_started_command_line#bonus-esphome-dashboard
I can’t discover how to run it on a Windows system, if you’re using that
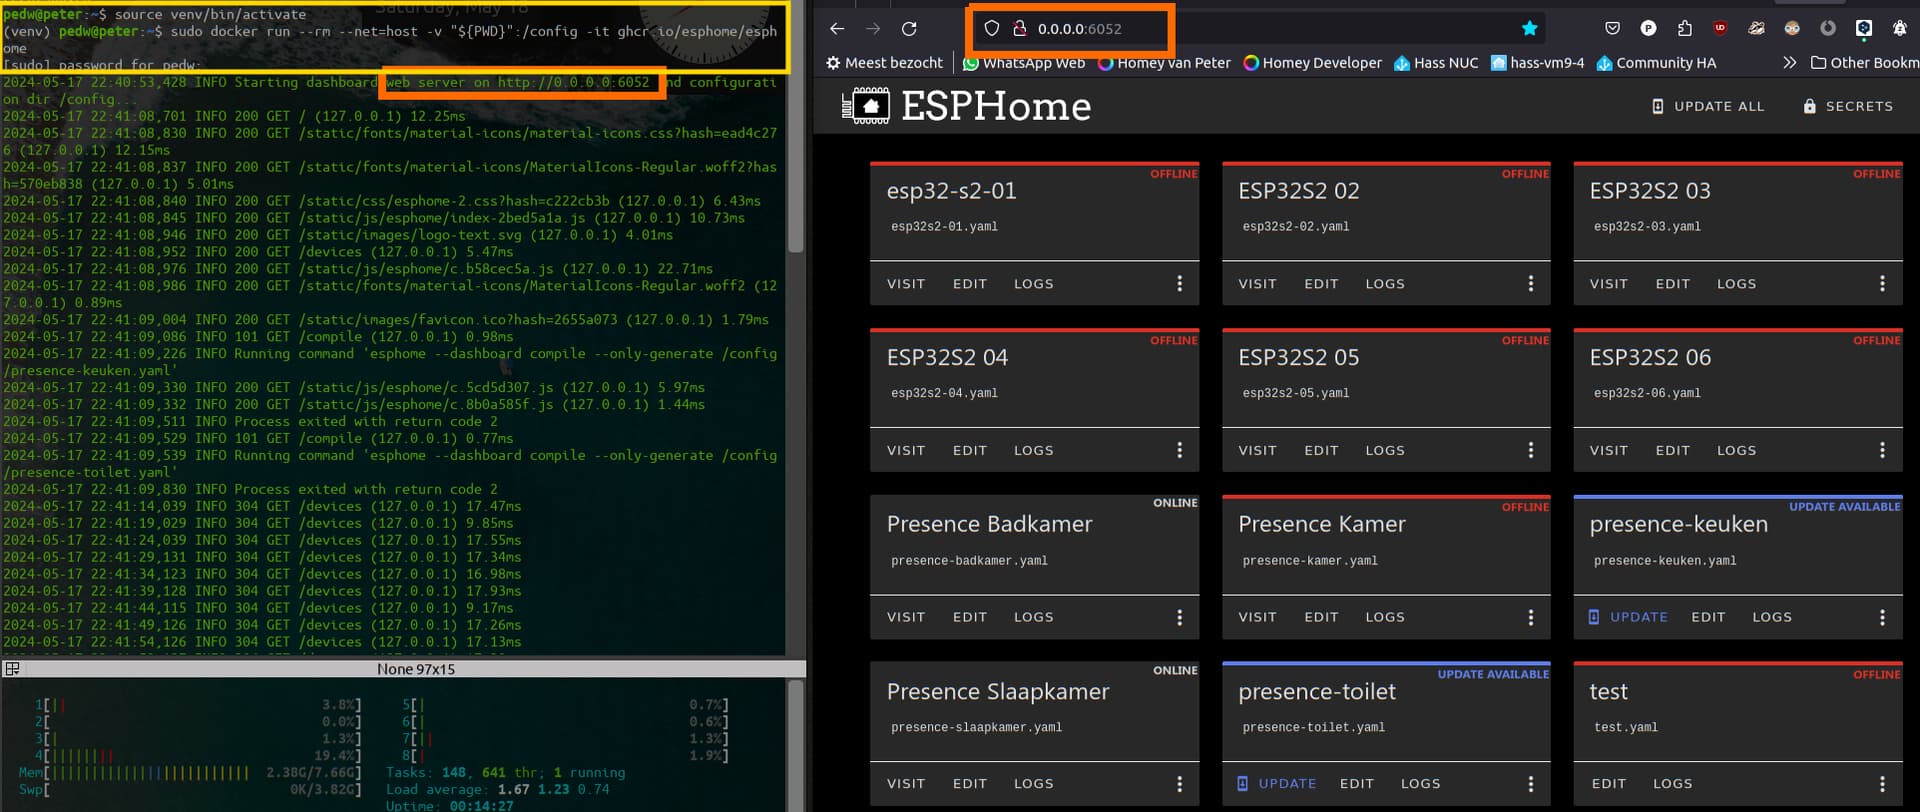
The commands:
$ source venv/bin/activate
$ sudo docker run --rm --net=host -v "${PWD}":/config -it ghcr.io/esphome/esphome
Now I can open the webpage http://0.0.0.0:6052 and it shows my dashboard and ESP devices
My ESP’s you see here have been added to Baldhor’s Homey ESPhome app
I can see the board’s IP address on an IP scanner I have on my phone. If I type the IP address into a browser, nothing happens. I don’t get on the board.
Within the ESPHome folder, there are no files that end with .uf2? I only have some .bin files?
But it seems I have now broken through to the ESPHome Dashboard. Then I will take it from here.
Doesn’t it look very right?
-Michael
Ah, ok.
When you edit the .yml you can add the current IP, to make sure it can be reached.
First, at the wifi section of the .yml, start with adding the
use_address: line, and enter the devices’ current IP
Like:
## https://esphome.io/components/wifi.html#manual-ips
wifi:
  ssid: !secret wifi_ssid
  password: !secret wifi_password
  ### when board got new IP, but doesn't
  ### connect, uncomment the line below, and enter the board's previous IP:
  #use_address: 192.168.xx.xx

  ### set static IP when DHCP fails,
  ### edit and uncomment the 4 lines below:
  #manual_ip:
    #static_ip: 192.168.1.23
    #gateway: 192.168.1.1
    #subnet: 255.255.255.0
If that doesn’t work, use the last 4 lines to temporary add a static IP. Again, add the current device IP here.
How about to connect it to Homey, how do you do that?
Baldhor, I’ll tag a few developers who might be interested. No clue, but you never know ![]()
@Arie_J_Godschalk @spkesDE @RonnyW @martijnpoppen @Gruijter
Maybe ESPhome is an interesting app for you?
Or do you know any other dev who might be interested?
Thx,
/Peet
In the github, there are several example of yml files I’m using for my own devices.
Including some ‘very’ (?) advanced ones (relay heaters, tb cover, …):
I have no idea what functionnalities your device provide or if you found an adapted yml for your model. But if you need to write your own config, you can probably pick some ideas there.
Worst case, you can ask on the ESPhome forum, they are often very helpful and friendly.
Is there a way to show a capability as status indicator on the device tile? Like percentage, or degrees etc.
And I cannot seem to find how I add a device capability to just read data from the esphome. I would like to show the status of a button, but I can’t seem to add it because when I select a capability from the list, it goes back to make selection. Any idea ![]() ?
?
Thanks, I know about that function ![]() , but it says “status indicator None”, so i cannot select anything. How can i make it so there is something to choose from?
, but it says “status indicator None”, so i cannot select anything. How can i make it so there is something to choose from?
I’m not too sure, I tested this function with several type of indicator and it was working. Maybe you need to match the on/off switch to another type ?
I followed the user guide for adding a read only value, but the app does not seem to select the “capability type”. Any idea what might be the problem?
Screen recording of the problem;

Hi,
What solution did you decide on in the end?
I have the same situation. I use HomeAssistant for all integrations and Zigbee network.
However, still on homey for their user interface. Really good “as is”.