Hello all,
I didn’t come across this anywhere so I thought I’d share how I used a light dependent resistor (https://en.wikipedia.org/wiki/Photoresistor) connected to a Wemos D1 mini flashed with Tasmota (https://github.com/arendst/Sonoff-Tasmota/wiki/Wemos-D1-Mini) to trigger my lights. This technique could be extended to alot of sensors connected to similar Tasmota devices. Currently in the Sonoff Homey app sensors are not directly supported so a suitable work around is required.
My D1 has an LDR connected similar to http://www.esp8266learning.com/wemos-ldr-example.php. Its flashed with the sensor version of tasmota ( sonoff-sensors.bin) from http://thehackbox.org/tasmota/release/020402/as without it the ADC on the chip is disabled.
Using the webpage on the D1 you should now be able to see the sensor reading

While here configure the device as initially as a Sonoff Basic (1), this makes pairing with Homey simpler
On Homey setup
- MQTT broker
- MQTT Client
- Sonoff (https://apps.athom.com/app/name.klep.sonoff)
Pair the D1 as a Sonoff Basic. Once paired you can reconfigure it (via the D1 webpage) to a generic device (18) without affecting the pairing. This allows full use of its pins/connections.
Open the console of the D1 & enter the following rules to suit your purposes (https://github.com/arendst/Sonoff-Tasmota/wiki/Rules). The restriction here is that the MQTT client cannot (as far as I can tell) extract a variable & store it from the messages sent by the D1 beyond a yes/no, 1/0, true/false. So in my example I created a rule that sent out a predefined message based on the LDR value.
Rule 1
rule 5
Rule on analog#a0<200 do publish stat/post/luxlow TRUE endon on analog#a0>200 do publish stat/post/luxlow FALSE endon
The first line enables the rules, the second stops repetitive messages & only triggers on a change & the third line sends a message based on the value of the LDR crossing a threshold. Please note that the 200 above will need to be modified to suit your setup.
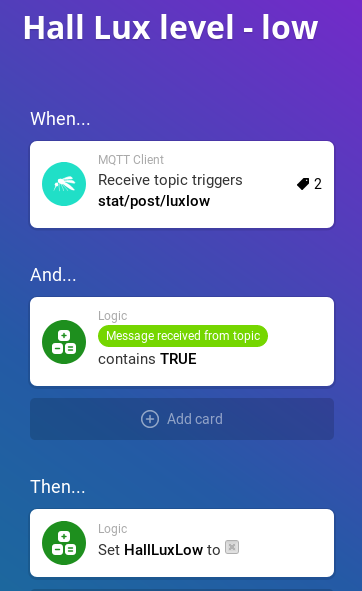
I then created a flow
& obviously another complementary flow to catch when the message when the LDR value went high.
After that all that was required was to get my light flow to trigger using the HallLuxLow variable.
Thanks to Robert Klep with his assistance it getting the MQTT client working for me!
Hope this helps others!
