As i heared that homeyduino is no longer supported at version 2.0 what is the best other choise tot communicate with a ESP8266.
Because my House is full with them and I am happy with how it is now working.
I want to keep al traffic local so if the internet is down it still can work.
That’s too bad. I’m also running a couple of ESP8266 devices with homeyduino. Have you taken a look at the MQTT Broker app?
Maybe check this post?
Did you file a request at https://support.athom.com/hc/nl/requests/new so Athom knows more people want this?
Yes it is! Buy isn’t mqtt working on a external server so you always need internet?
Good one but needs al lot more programming I see
Smart will do that 
Don’t know 100% sure (@scanno can tell probably) but I think everything needed for mqtt is running on Homey:
https://apps.athom.com/search?query=mqtt
The MQTT Broker app is running on Homey and is a MQTT 3.1.1 compliant server. Are there any specific questions? Wiith the MQTT client app you can create triggerCards that trigger when a message is received on a topic that is given in that triggerCard. You can also send a message on a specific topic.
When using the broker and client, all can operate on locathost.
Oke have been looking in to the MQTT and it looks good, need more programming but not much.
Is there some example of sending a value from the ESP or to?
I recently converted a Homeyduino project to MQTT and a VirtualDevice. It was rather easy!
For you arduino project you can take a look at PubSubClient
Below you can take a excerpt of my code:
const char *mqttServer = "192.168.1.61";
const int mqttPort = 8883;
const char *mqttUser = "test";
const char *mqttPassword = "uno";

WiFiClientSecure espClient;
PubSubClient client(espClient);
const char *motion_topic = "home/hallway/pir/motion";
const char *luminance_topic = "home/hallway/pir/luminance";
// after connecting to your wifi don’t forget to connect to the MQTT Server
if (!client.connected()) {
    client.setServer(mqttServer, mqttPort);
    client.setCallback(callback);
    Serial.print("Connecting to MQTT server "); Serial.print(mqttServer);
    while (!client.connected()) {
      if (client.connect(clientId.c_str(), mqttUser, mqttPassword ))
      {
        Serial.println("\tconnected");
      } else {
        delay(500);
        Serial.print(".");
      }
    }
  }
// After reading some sensor values publish the values
float lux = lightMeter.readLightLevel();
client.publish(luminance_topic, String(lux).c_str(), true);
client.publish(motion_topic, motionDetected ? "1": "0", true);
Then subscribe to topic and set Virtual Device capability


Nice, will check it to night
I wrote already in an other topic, that I got the answer from Atom Support, that they will not support Homeyduino in the future:
The developers respond me that they do not support the Homeyduino app. I am sorry for the inconvenience, we will adjust the website so that this is clear in the future.
I answered that this is a bit confusing, because the Homeyduino app was developed by Athom. Afterwards I got a new answer:
What is meant with this is that we cannot give support on user-made projects with this app. If these do not work, it is often not because of the app or Homey, but because of the user’s code. I hope that you understand this decision.
In this case however, there appears to be a problem with our software and developers are looking into the issue, in order to solve it with a future update.
So they will support the app also in the future. That they can not support the applications that run on Arduino is clear. But the basic API should work and should also be supported.


So it looks like they will be giving support to the app, happy me😁
But just te be sure and to have some fun will try to make a version with MQTT
And what about sending data to the Arduino?
So it’s the fault of your code that the iOS app crashed ![]()
You need to define a callback function before connecting to your broker using the setCallback(callback) method. After connecting to the broker subscribe to a topic using the subscribe method. For an example take a look here
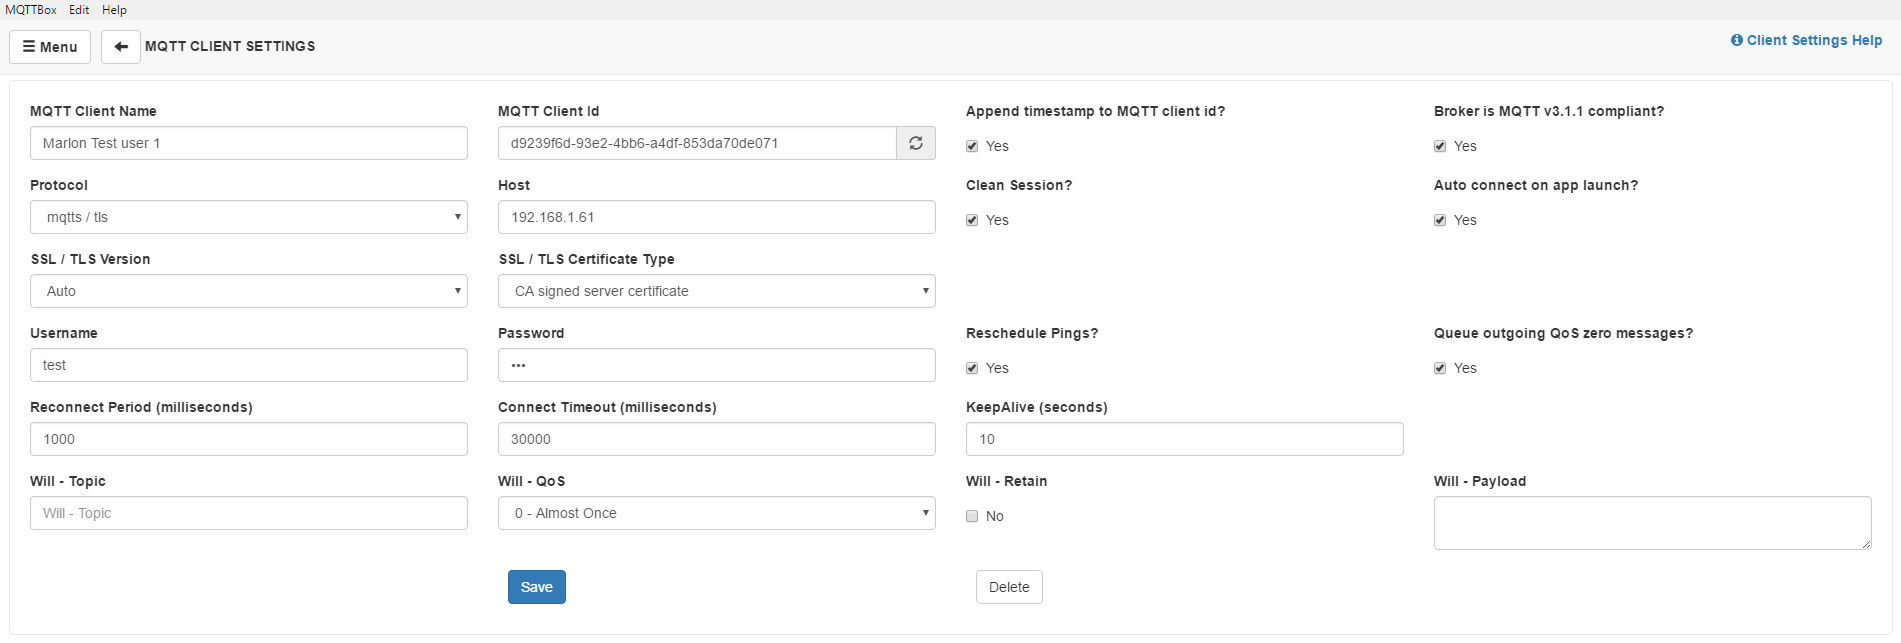
@Marlon Oke I did some testing, but I don’t think I have set the settings of the app correct.
Can you also post some screenshot’s of you’re settings?
Thanks
Configure your MQTT Broker

Configure the MQTT Client

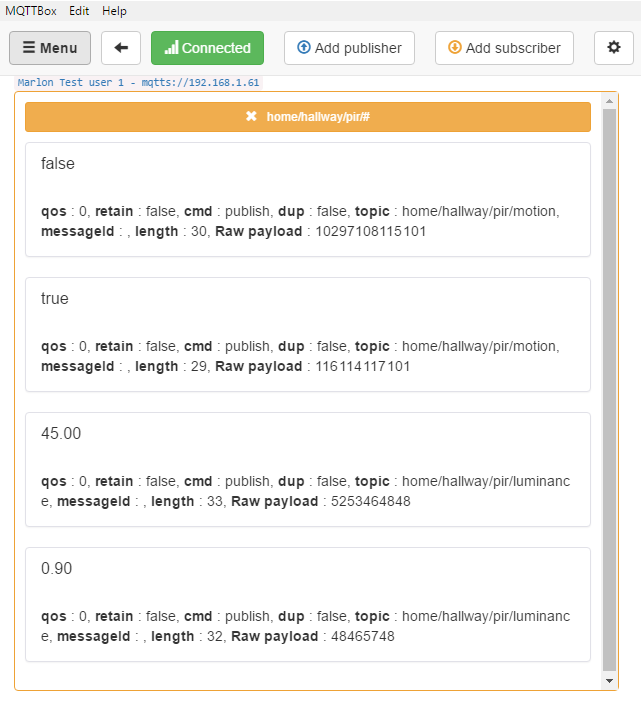
For testing I used MQTTBox since I’m running on windows. This is optional of course.
Configure the client
Subscribe to the topic

Afterwards you should see your sensor events
Good luck! 
