I’ve been testing the Amina S EVSE charger in combination with Homey for a month and time to share my first thoughts here. I’ve been sponsored the Amina S device, but Amina is not influencing this post.
Situation:
- Homey Pro 2019 with advanced flows enabled.
- Dynamic contract from Tibber.
- Single phase 25A infra for an EVSE charger already in place due to previous chargers.
- Experience with an OpenEVSE, SmartEVSE and Tesla TWA gen 3.
- Measuring with HomeWizard Wi-Fi kWh meter 1-phase MID.
- Driving a Hyundai Kona without “Blue Link” and a Tesla model 3.
- I don’t use loadbalancing while I’ve splitted the three phases to have a dedicated phase per the two cars and the house.
Installation
The installation was really easy. It is divided into 3 steps:
- Fixing the base to the wall. This is only plastic and therefore very light. Easy to hang properly.
- Connecting and inserting the actual charging unit.
- Setting up and close the housing.
Hanging the base and closing the lid are pretty straight forward but connecting the actual part is sometimes a bit fiddly. With the OpenEVSE and SmartEVSE I’ve build the units in complete before hanging and struggling with the thick and massive cables was a bit difficult. This proved to be very easy with the Amina S while I could test fit the length of the wiring, adjust, connect the wires and just click the charger into the housing. Connecting the charger cable itself was a bit more challenging while the preshrunk while the cable shoes are a tight fit.
Setting up
Linking the device to the Homey Pro was easy once understanding the principle. As the order of setting up the device wasn’t clear from the manual I had to open up the device (2 screws) and put the charger in pairing mode. These instructions are only on the homey installation page. My Homey Pro is placed in a closet (wood), 7 meters away from the charger and separated by an inner and outer wall. Connecting the Zigbeee went without any problems.
Charging for the first time
Once the device is set up charging is as straight forward as connecting the car and the charger starts. Controlling the charger from Homey is also pretty simple; there is a on/off switch in the app in which the device responds directly to.
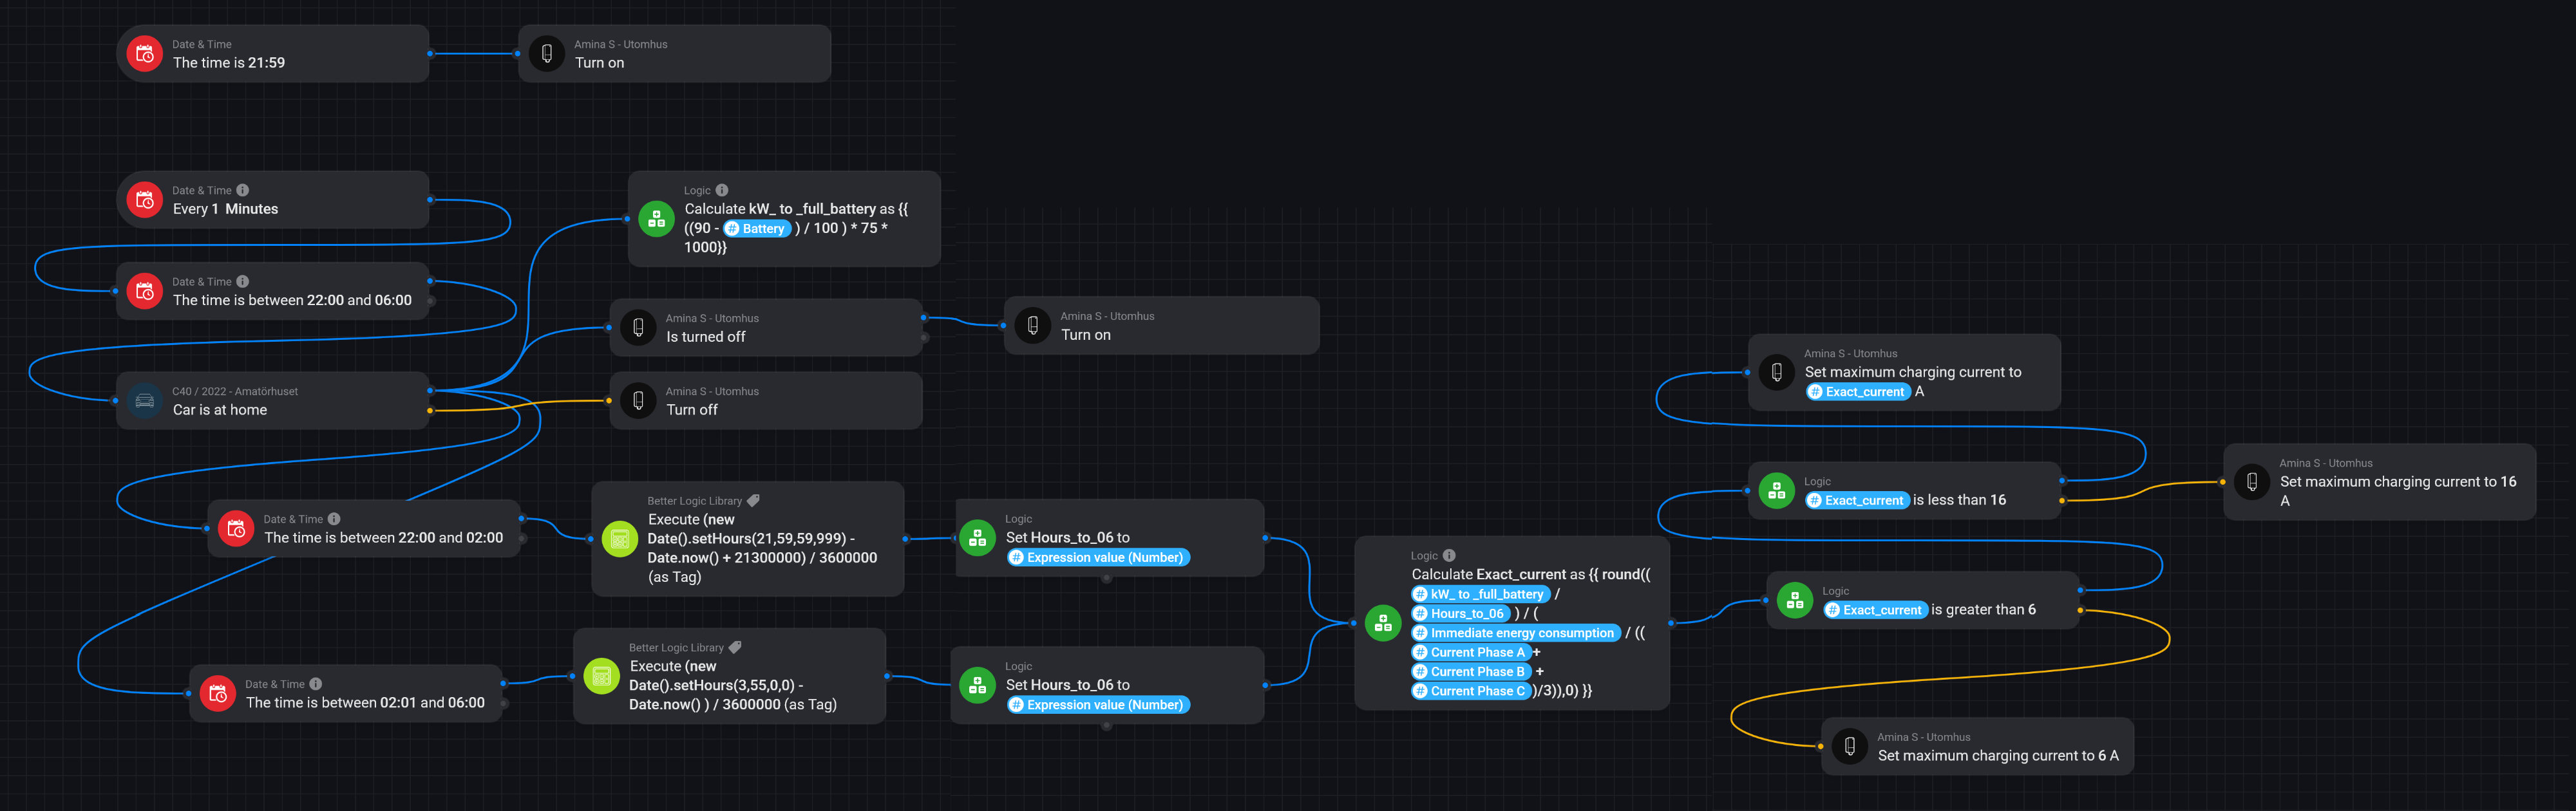
Setting up the flow
As I already had a flow in place for the OpenEVSE I only needed to add this charger to the existing flow. For this I’ve used an advanced flow consedring the following steps:
- Starting with a trigger from the Tibber app when the price is changed.
- When the price contains “Expensive” the charger should be stopped, otherwise the charger should be started.
- There is a check whether the charger state is on or off before sending the on or off command
- There is a variable controller the max price from Tibber to control charging times more precise.
- There is an override to enable the charger in the morning with freezing temperatures while the Hyundai otherwise won’t start the preheating.

Considerations
The installation part was easy and beside having to try pairing the device a couple of times the whole process was done in a good hour or so.
The advantages for the Amina are
- The charger is smart by itself and there is homey an integration straight from the supplier.
- The installation is easy, though the preparations should be done by a certified electrician.
- Everything works as expected.
The things I’m missing
- There is no “integrated” place to put the connector back. This is now hanging loose and the rubber cap should be used to protect the connector from rain.
- No readable temperature sensor.
- Tesla open charger port button (this is obviously not something Amina should be fixing).
As for the OpenEVSE I’ve created an integration with a Fibaro implant. the effect and the controlling options are the same, but missing the extra information from the charger itself like the charging and connection state. The Fibaro smart implant utilizes a temperature sensor which I use for the Hyundai preheat fix, this I mis on the Amina.
As for the SmartEVSE there was no implementation for Homey. This I had to write the integration myself. Using the API from the SmartEVSE the result was the same as with the Amina, but obviously took a lot of time.
The Tesla TWA Gen 3 isn’t directly comparable. This is only suitable for Tesla drivers to utilize the benefits of this charger. The upside of this is that you can control who’s able to connect and controls the Tesla charger port. The downside is that there are no charging control options for the charger unit itself and has to be controller by the Tesla car itself with the available API’s.
Future integrations:
As I now have a basic implementation for controlling the charger I’m considering a couple of modifications for the near future:
- Creating a physical override button to immediately start charging regardless of price.
- Agenda integration for overriding “expensive” hours when needed.
- Creating an authentication mechanism. (wifi presence, rfid, hidden button inside the house, usw, usw)