Micro Web Server
This app turns your Homey into a basic WebServer for your local network.

App Store: Micro Web Server
Frequently Asked Questions
Change Log
Supported Languages
![]() English
English
![]() German
German
What? Yes, a WebServer!
There are some use cases where you simply do not want to run another device just to serve a few resources by http.
The app runs a WebServer locally on Homey. This WebServer is not reachable from Internet.
You can use it to host basically any resource you need in reach on your local network. Like a sound file used by another app. Or a full web page even.
Got your own Homey Dashboard written in html and javascript? Let it be served by home itself.
Warning and Disclaimer
Whilst you could basically make the Homey hosted WebServer public on the internet using port forwarding, I highly recommend not to do that. The app is not meant to serve tons of requests from random people.
Also, I am not responsible for the content you are hosting with it, nor for any possible harm one could do to your Homey by abusing it.
Getting Started
To get started, go into the app settings and start the integrated ftp server. Whilst the ftp server is running you can manage the content of your Homey WebServer with basically any ftp client.
Step 1 - Getting Ready for File Uploads
First thing to do after installing is provide some content to be hosted.
To get files onto the Homey we need to start the ftp server of the app. For security reasons it is not running by default.
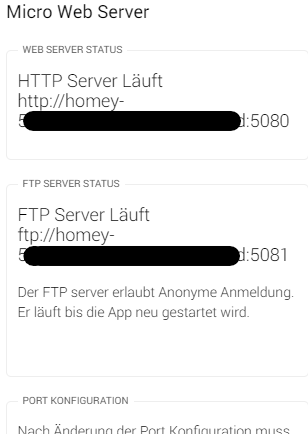
Open the settings of the app. It should look somewhat like this:

After the ftp server is started you should see the ftp address:
Step 2 - Connect The FTP Client
Upload your files. Am using FileZilla here as it has proven to work nicely.
Open FileZilla and connect using the hostname shown after ftp:// (or your Homey’s IP) for the Host setting. The default port is 5081 and for login you need to use anonymous authentication:

And connect.
Step 3 - Upload Files and Test
After uploading the files you can address them by using the http address shown on the app’s settings page.
Let us assume you just uploaded a giggle.mp3 file. The address would be: http://homey-YourHomeyId:5080/giggle.mp3
About Directories
You can create or upload directories as well. If you open a directory url in your browser instead of pointing to a dedicated file, the app will automatically look for an index.htm or index.html file. Other default index files are currently not supported.
Available Flowcards
Triggers
A WebTrigger was received
WebTriggers are basically WebHooks which are available, by this WebServer, on your local network only.
Arguements
- ‘Respond to Trigger Name’ defines the name of the trigger to react to.
Tokens
The WebTrigger can carry up to 5 payloads which are made available as tokens to the flow being run. Each payload as 3 representations as follows:
- ‘Trigger Data # (as text)’
- ‘Trigger Data # (as number)’
- ‘Trigger Data # (as boolean)’
In addition the trigger name is available in the flow as text value:
- ‘Trigger Name’
Usage
The WebTriggers are basic HTTP GET requests sent to the WebServer.
URL Example: http://homey-YourHomeyId:5080/webTrigger?name=MyTrigger&data1=MyTriggerData
Please note that the URL parameters are case sensitive.
The parameter ‘name’ defines the trigger name. It is the name you enter as arguement in the flowcard. The ‘data’ (data, data1, data2, data3, data4, data5) parameters are optional. The parameter ‘data’ is just an alias for ‘data1’.
An advanced WebTrigger was received
WebTriggers are basically WebHooks which are available, by this WebServer, on your local network only.
Arguements
- ‘Respond to Trigger Endpoint’ defines the endpoint of the trigger to react to. The base path is ‘/webTriggerAdv/’, so you can define as many endpoint as you like. Examples: /webTriggerAdv/MyTrigger, /webTriggerAdv/MySpecialTriggers/Trigger1, ..
- ‘Optional: Respond to specific method only’: By default the trigger card responds to any request (GET, PUT, POST; DELETE, PATCH) send to your endpoint. But you can optionally limit it to listen for a specific method only.
Tokens
The advanced WebTrigger provides access to following data of the request:
- ‘Trigger Endpoint’ (text) - The endpoint name after /webTriggerAdv/.
- ‘Method’ (text) - The HTTP method used.
- ‘Request has Body’ (boolean) - Whether the request has a body data.
- ‘Request has Json Body’ (boolean) - Whether the request has a json data body available.
- ‘Json parsing error message’ (text) - This field defaults to ‘No Error’. It will hold the error message if the requests body could not be parsed to a json object.
- ‘Raw trigger payload data’ (text) - The raw data object of the trigger flowcard. You could already use this but there is an action flowcard for advanced flows which provides you with easy access to the triggers data.
Usage
The WebTriggers are basic HTTP GET requests sent to the WebServer.
URL Example: http://homey-YourHomeyId:5080/webTriggerAdv/aTriggerName?queryValue=something&someOtherQueryValue=somethingElse
Please note that the URL parameters are case sensitive.
Actions
Get data from advanced trigger payload
This action is available in advanced flows only and provides easy access to any data received from the webhook.
Arguements
- ‘Trigger payload token to use’: The flow token (Raw trigger payload data token) provided by the trigger flowcard to be used.
- ‘Data source’: Where to look for data. This can either be the request’s header fields, the url query parameter fields or the request’s json body data.
- ‘Data Field to extract’: The name or path of the data field to extract. In case of the headers (mind that header field names often are lower case automatically) and url query fields you just use the name of the field here. For the json body you can address nested fields with the dot syntax (Example: MyObject.MyObjectValue). You can also access individual array elements using the bracket index syntax (Example: MyArray[23]).
Tokens
The card emits flow tokens for the extracted field:
- ‘Trigger Data (as text)’
- ‘Trigger Data (as number)’
- ‘Trigger Data (as boolean)’
Usage
Here is a very basic advanced flow example to give you a better idea of how it works:
This flow would now react to a request like this:


