New test version 1.7.3:
- Just some small improvements for dynamic mode list.
New test version 1.7.3:
Hi, wanted some advice on the best way to setup (if possible ) my Solar panels? The current Solar panels app in Homey is broken (seems like an API update issue) but works fully in Home Assistant.
I’ve added it as a compound device but just shows as a device consuming power, rather than generating. So not showing on the outside of the Homey energy ring
Hi,
1st: You should think about removing the compound devices and replace it with custom devices.
About energy in general:
Homey only uses measure_power capability for the EnergyDashboard. That means, a device can only have one power capability. All others can only be added as subcapability (like measure_power.sub1) and aren’t used for EnergyDashboard.
So let’s start ![]()
I also use the Fronius HA integration. There is also a Homey app, but importing HA data into custom devices is a lot more flexible. You will see why…
I thought about all energy values I want to have…
So I added all as a custom device with custom icon.
Then I added the corresponding HA entity in rerpair view as measure_power capability.
Now you can change the device settings.
Select “solarpanel” as device class for your solar production device.
Battery is a special one. The HA integration has a sensor which has positive value for battery discharging (usage) and negative for charging.
I want to see battery charging as “usage” power in Homey because it should be substracted from production.
Battery discharging “returns” this energy. It works like a solarpanel. So I defined this device also as “solarpanel” device class.
Both devices should only get “their” battery power part (negative/posisitve). I use the converter for:
Battery charging: Positive values are cleared (set to 0), negative values are used as negative (*1 to convert HA string state into numeric Homey value). Solar panels have to report negative values (see developer docs for details).
Battery discharging: same, but for positive range:
Good luck. To try the result, I used the mobile app for EnergyDashboarb while changing the devices in WebApp.
Oh Wow, brilliant. Thanks very much, I’ll work through and let you know how it goes.
New test version 1.8.0:
Hi Ronny,
diag. id 9e0ce4e0-3076-4775-a0b5-8cfb93ed6cea
I had to go back to stable version, because existing flows stop working as some states are not populated anymore. Not sure it’s intended or not…
Example : measure_generic.select.water_heater_mode is N/A after update
Didn’t check more now, just was wondering why some existing flows stop working…
You are right. It seems the wrong flow parameter is filled now. Thanks for reporting.
I had to change the type check for capabilities to support enum capabilities (modes). So exchanged one issue with another ![]()
I made some further changes yesterday to read capability type from the capability. I will check the flows before publishing a new test version.
New test version 1.8.1:
@Sharkys FYI and to test (if you dare ![]() ).
).
Thanks for the speedy fix!
So far, 1.8.1 works perfectly. ![]()
Hello @RonnyW ,
I have included a power meter (custom), with device class “sensor” , capabilities “measure_power” and “meter_power”. In the new energy-tab from Homey, this meter does not get recognized correctly. The Energy tab states that the power meter only have real-time measurement, that is not true.
I have tried to add a new device with only one Entitie with capabilitie “meter_power”, then it showed up, but never updated values. “meter_power.imported” with the same Entitie did not get recognized.
Do you have any clue what is going on?
Attached screenshots:
Developer tool-
Device settings-
Energy-tab Homey app:
It looks good. I’m not sure what’s wrong.
What message is shown after adding the device?
And main capabilities measure_power and meter_power should be right.
Did you wait a time? I also recognized that changes need some time to show up in HomeyEnergy.
What message are you thinking about? I already had the device included with Main capability “measure_power” and “meter_power”. With my experimental tries I waited at least one hour, because the kWh is only updated at the whole hour.
I have sent you the details from the device in a private message.
I meant this:
What message are you thinking about?
But it won’t show more then you wrote. So not relevant I think.
It has to be a bug at Athom. I have given up to report issues as I am considered “just a user”, can you report it? If you consider it as a bug, like I do.
Hope it’s OK to post here:
With these very nice gauges (HACS store integration link here), I wanted gauges without (relevant) information to turn grey-ish, instead of hiding them completely.
With the new “Sections” dashboard view-type, it’s very easy to hide elements on certain condition(s).
Now,
from one of these 2 gauges:
I just duplicated the original gauge, changed the colors to grey-ish, and added it to the section.
In edit mode, you’ll see “everything”, all 3 gauges, and the “Zon Output” gauge twice, in different colors:
Now, whith the settings saved, and the dashboard back in ‘live’ view:
When the value of that sensor is below 1, it shows the grey gauge instead of the colored gauge:
To make both gauges switch, just add a “visibility” entry, along with these different conditions, (next to condition and entity):
above: 1 for the colored gauge;
below: 1 for the grey gauge;
type: custom:canvas-gauge-card
entity: sensor.solar_total_output
name: null
card_height: 165
shadow_height: 0%
font_size: 0.95em
font_color: "#000"
shadow_bottom: 10
gauge:
  type: radial-gauge
  units: Watt
  title: Zon output
  width: 185
  height: 185
  borderShadowWidth: 3
  borderOuterWidth: 1.2
  borderMiddleWidth: 1
  borderInnerWidth: 0.2
  minValue: 0
  maxValue: 7000
  startAngle: 45
  ticksAngle: 270
  valueBox: true
  majorTicks:
    - "0"
    - "750"
    - "1500"
    - "2250"
    - "3000"
    - "3750"
    - "4250"
    - "5000"
    - "5750"
    - "6500"
    - "7000"
  minorTicks: 3
  strokeTicks: true
  highlights:
    - from: 0
      to: 1500
      color: darkorange
    - from: 1500
      to: 3750
      color: yellow
    - from: 3750
      to: 7000
      color: lightgreen
  colorPlate: "#00001f"
  colorTitle: "#eee"
  colorUnits: "#eee"
  colorNumbers: "#eee"
  colorMajorTicks: "#300000"
  colorMinorTicks: "#00001f"
  borders: false
  needleType: arrow
  needleStart: 30
  needleEnd: 85
  needleWidth: 4
  needleCircleSize: 12
  needleCircleOuter: true
  needleCircleInner: true
  colorBorderOuter: "#fff000"
  colorBorderOuterEnd: "#111"
  colorBorderMiddle: "#222"
  colorBorderMiddleEnd: "#111"
  colorBorderInner: "#111"
  colorBorderInnerEnd: "#333"
  colorNeedleShadowDown: "#333"
  colorNeedleCircleOuter: "#333"
  colorNeedleCircleOuterEnd: "#111"
  colorNeedleCircleInner: "#111"
  colorNeedleCircleInnerEnd: "#222"
  valueBoxBorderRadius: 0
  colorValueBoxRect: "#222"
  colorValueBoxRectEnd: "#333"
  animationDuration: 1500
  animationRule: linear
grid_options:
  columns: 6
  rows: auto
visibility:
  - condition: numeric_state
    entity: sensor.solar_total_output
    above: 1
type: custom:canvas-gauge-card
entity: sensor.solar_total_output
name: null
card_height: 165
shadow_height: 0%
font_size: 0.95em
font_color: "#000"
shadow_bottom: 10
gauge:
  type: radial-gauge
  units: Watt
  title: Zon output
  width: 185
  height: 185
  borderShadowWidth: 3
  borderOuterWidth: 0.3
  borderMiddleWidth: 1
  borderInnerWidth: 2.76
  minValue: 0
  maxValue: 7000
  startAngle: 45
  ticksAngle: 270
  valueBox: true
  majorTicks:
    - "0"
    - "750"
    - "1500"
    - "2250"
    - "3000"
    - "3750"
    - "4250"
    - "5000"
    - "5750"
    - "6500"
    - "7000"
  minorTicks: 3
  strokeTicks: true
  highlights:
    - from: 0
      to: 1500
      color: darkgray
    - from: 1500
      to: 3750
      color: darkgray
    - from: 3750
      to: 7000
      color: darkgray
  colorPlate: "#00001f"
  colorTitle: "#eee"
  colorUnits: "#eee"
  colorNumbers: "#eee"
  colorMajorTicks: "#300000"
  colorMinorTicks: "#00001f"
  borders: false
  needleType: arrow
  needleStart: 30
  needleEnd: 85
  needleWidth: 4
  needleCircleSize: 12
  needleCircleOuter: true
  needleCircleInner: true
  colorBorderOuter: "#fff000"
  colorBorderOuterEnd: "#111"
  colorBorderMiddle: "#222"
  colorBorderMiddleEnd: "#111"
  colorBorderInner: "#111"
  colorBorderInnerEnd: "#333"
  colorNeedleShadowDown: "#333"
  colorNeedleCircleOuter: "#333"
  colorNeedleCircleOuterEnd: "#111"
  colorNeedleCircleInner: "#111"
  colorNeedleCircleInnerEnd: "#222"
  valueBoxBorderRadius: 0
  colorValueBoxRect: "#222"
  colorValueBoxRectEnd: "#333"
  animationDuration: 1500
  animationRule: linear
grid_options:
  columns: 6
  rows: auto
visibility:
  - condition: numeric_state
    entity: sensor.solar_total_output
    below: 1
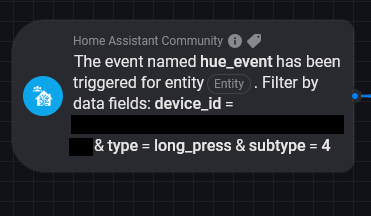
Since some time I’m using the Hue Bridge via HA in Homey. This way I am using flows to control both my Hue lights and my Dimmer Switches. The lights are added as lights using this app and the Dimmer Switches are controlled using the following flow cards:
This all works as expected, but since I some other non Philips Hue Zigbee devices I have a second Zigbee network that is controlled via Homey. This is not a desirable solution for me, so I have decided to set up a new Zigbee network via MQTT, where all devices will be included. MQTT is hosted on HA, so I still want to use this app to show my devices in Homey. As a test I already transferred some lights and some dimmer switches to my new network. The lights work great, but I have a small issue with my Dimmer Switches. They only seem to work when using the “The state of entity has changed” card. Any other card, including the event card shown above as shown in the screenshot, or cards dedicated to the device (which I added as a sensor) do nothing. This is the case even though I see a change in the action entity in HA.
Is using “the state entity has changed” the only option to use a Dimmer Switch using MQTT via HA or could it be that I’m missing something?
Some technical details:
A light has a persistent state (on/off, dim level) that is stored in entity state and attributes.
A dim switch has no persistent state. It has only buttons and if one is pressed, the an event is thrown. The Hue bridge (for example) reacts on these events and changes the assigned lights(s).
This way you have a light device with capabilities (the states) and you can react on events from the remote with event flow trigger.
Mqtt has only persistent states. They are stores in topics.
If a light changes, the topic changes its value. This is represented in a HA entity state and that is represented in a Homey device capability.
For the remote it depents on the Zigbee/Mqtt integration how such events are handled. If you can see them as a HA entity state, the I think if you press one of the buttons, the topis value is changed (on/off).
If that’s the case, you should have a HA entity with an on/off state (like a light). So you get a Homey device with the corresponding capability (onoff capability should be best to use).
New test version(s) 1.8.2 and 1.8.3:
Here is a short manual how to add a HA smartmeter to Homey:
Hi Ronny, thank you for this manual. So much information packed on just one single page!
Would you be willig to make a similar manual on how to add entities (smart plugs) to the energy tab? I am a bit lost there…
I have some 80+ power meters in HA / zigbee but most of them are not shown in the energy tab. I have checked the capabilities and they all have the measure_power and meter_power capabilities and they are not set to cumulative.
However, most of them have been added as switches. Is it possible only ‘customer devices’ / ‘sensors’ are shown?