Today the MQTT Broker App has been released in the App store beta channel.
With this App it is now possible to have a complete MQTT Broker on Homey. The app is based on the Mosca nodejs library. The Mosca library is a library that is used to implement a MQTT Broker on a web based platform using nodejs.
So you no longer need to install a MQTT Broker on a NAS, homeserver or use a MQTT Broker in the cloud. You can simply install one on your Homey (MQTT Broker | Homey ).
What is a MQTT broker?
A MQTT Broker is a service that provides a Publish / Subscribe mechanism often used in IoT solutions. This means that an App or Device can subscribe to a topic. When another App or Device publishes a message on that topic, all Apps or devices subscribed to that topic, will receive that message.
What do I need?
You just have to install the MQTT Broker for Homey App and go to its settings page. There you have to provide the IP port you want the broker to listen on for messages. If you don’t know what to enter there, use the default 1883 value.
Second you will need to enter usernames and passwords for Apps or Devices that need to have access to the Broker. And that’s it.
With the MQTT broker for Homey it is possible to generate selfsigend certificates to enable TLS connections. Using offically signed certificates is always better, but not everybody knows how to do this and even with a service like Letsencrypt it is still difficult to do so without having a running HTTP server that is connected to the internet.
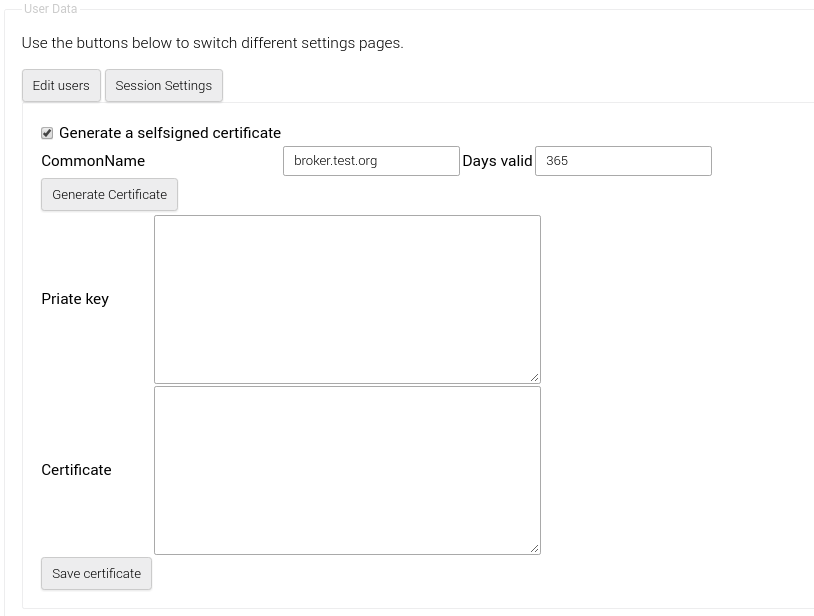
Generating a selfsigned certificate is very easy with the MQTT Broker for Homey. After you have installed the MQTT Broker for Homey from the App Store, go to the settings page an go to the Session Settings. On that page check the Generate a selfsigned certificate checkbox.
In the CommonName field enter the DNS name where your Homey resolves to (or use the internet IP adress). As default the Days Valid field is set to 365 days. That means that the certificate will be valid for 365 days. After 365 days you will need to generate a new one.
After entering the CommonName field, just press the Generate Certificate button to start generating the selfsigned certificates. Please be patient because it can take up to 30 seconds (or more) until the generation has been completed.
Once generation has been completed, you will see the Private key and Certificate text boxes filled with data:
After the text boxes are filled, the generation process has finished. Press the Save certificate button to save them the the internal storage of homey.
Quick question: does retained messages work with this broker? I’m trying to attach a device which should react to retained messages if the device is disconnected or woken up from deep sleep. However, the retained message doesn’t seem to be received. Switching to mosquitto without doing any other changes my code works as expected!
Hi guys, how do I find out whats the MQTT Host() ? Not sure how do I obtain that IP address. Need it to complete MQTT configuration of a tasmotized sonoff.
Hi
Is there anyone who can tell me how to use topic command.
i have an esp with espeasy on and can see it in my broker. It’s a temperature sensor. How do I get tempature in a flow.
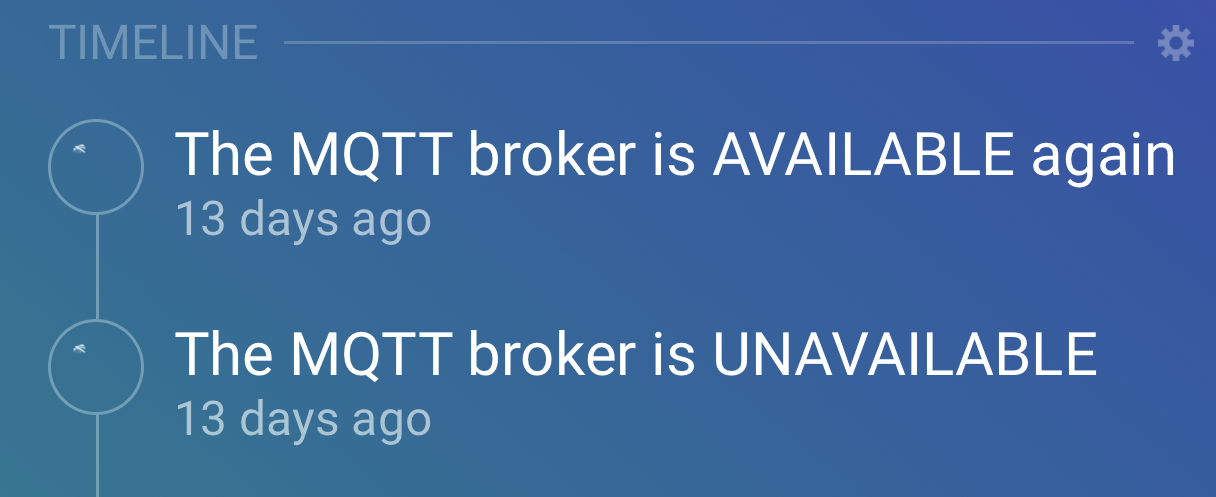
On this broker messages are NOT retained when the broker or homey is restarted. The messages are stored in memory, just for the simple fact that there is (or was) no database available to store messages in. That would have meant writing a storage mechanism myself. Not something that is easily done as you can imagine.
I set my homey mqtt broker there are all family member owntrecks but I not see all member, only one. can you tell why? Or I need install mqtt my synology and that is work fine… I need help. thanks .
I installed the homey mqtt broker and location & persence and iPhone owntracks. I only 1 account add to mqtt broker that is I used location app configuration
And the owntracks settings dns and separate userid like wife name and childrens name but same password make broker settings. There is connection is connected. And see all devices location & presence app configuration page.
Hey. Im building a MQTT dashboard for Homey, SpaceHomey. In this Im using MQTT to create it. The problem with web is that you need Web Socket to be able to talk to MQTT. For me I have a separate mosquito server running where I have enabled it but I want to make it simple for everyone else. Is it possible to add the option to this app to enable Web Socket? Then users can just use this app together with MQTT Hub and we are good go.
Hey. The MQTT broker needs a complete overhaul because the used node library has been depricated. But is was possible to use a websocket as far as I can remember. But as said, I need to find a replacement MQTT broker library I can use.
I have mentioned this before, but the MQTT broker app is based on the Mosca MQTT library. The problem is that this library is not maintained anymore and has the depricated status. If I keep using Mosca there will be a moment it will stop working.
However, there is a replacement called Aedes and currently I am trying to get the MQTT broker app up and running using Aedes.
I have the app running with the new Aedes library (still needs some work to get all the settings working). But I need your help to test everything. At first glance everything seems to be working and with less memory usage as far as I can tell. This is with roughly the same functionality as the current app.
Please let me know if you want to test the new broker version as soon as it is ready for testing. I would not want to release it and find out half of the users have problems.


 my code works as expected!