Hi,
so because of very limited time I’m not capable of maintaining apps. Also for myself.
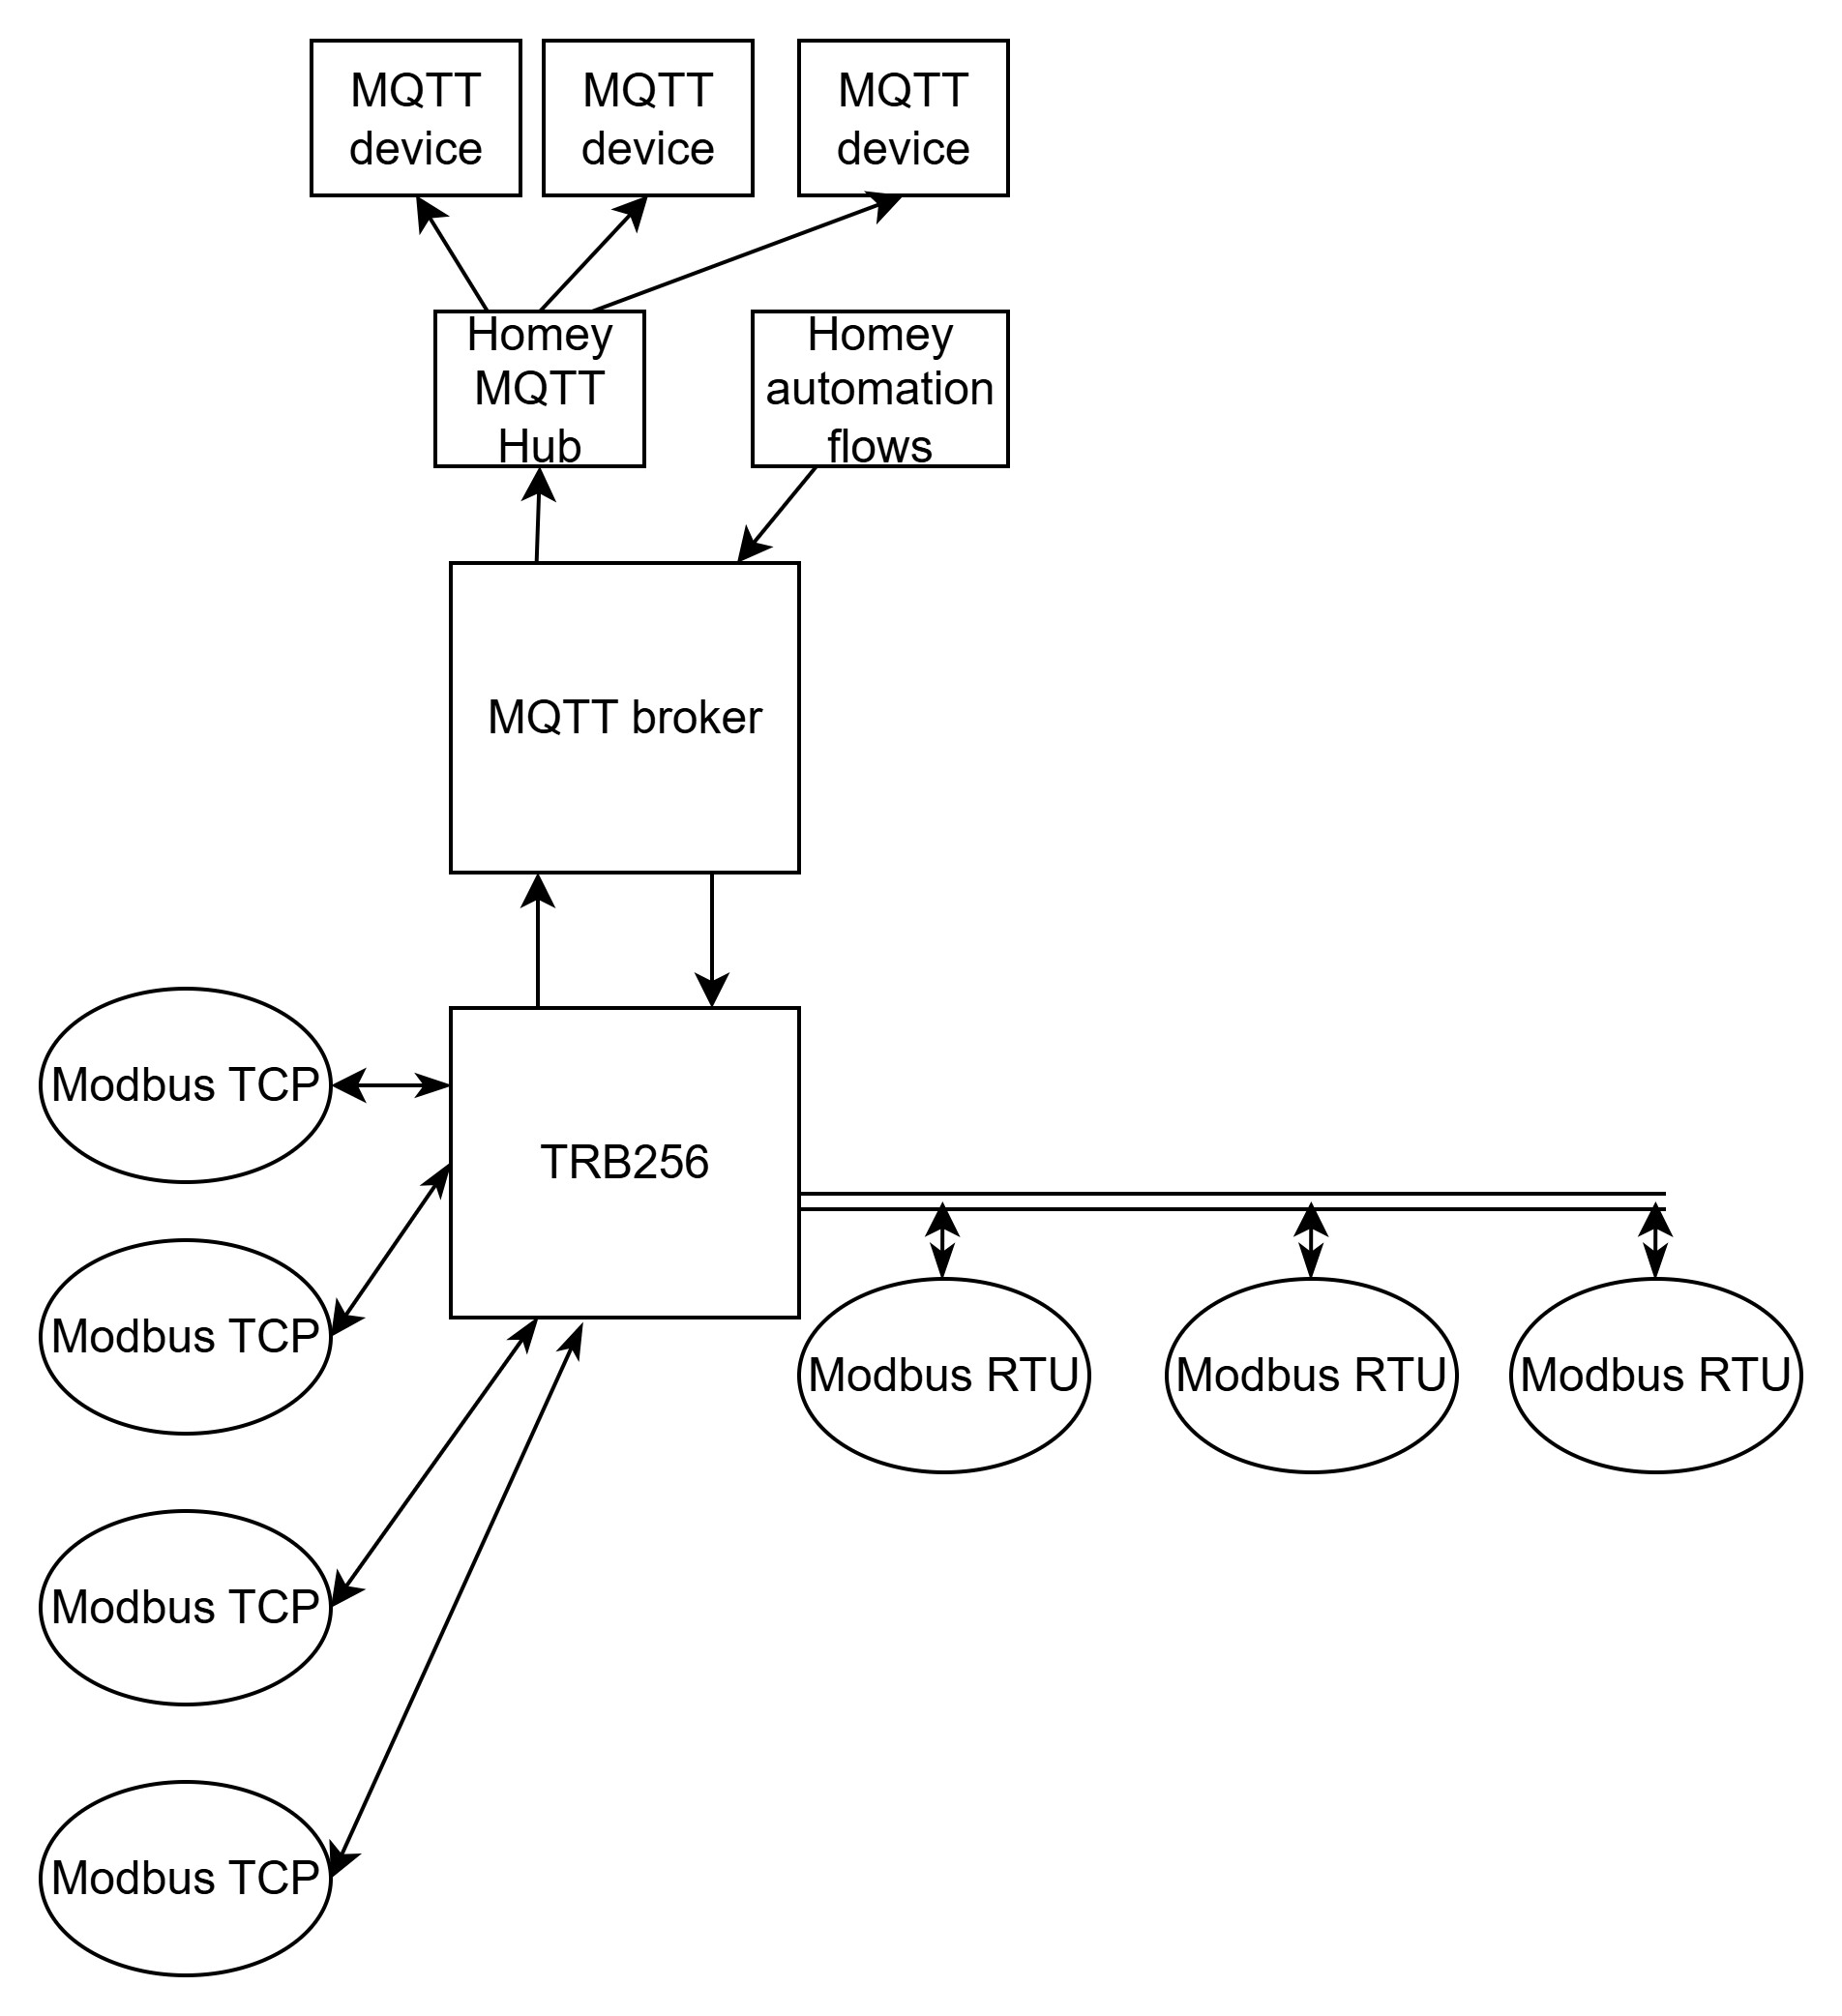
So I have a different solution using a Modbus gateway from teletonika (about $100).
It’s the TRB256 which will sit between Homey’s (internal) MQTT broker and (any) Modbus device. It will auto retrieve the data from your Modbus device and send in to your MQTT broker, where you can pick it up with MQTT HUB and MQTT client.
So, you login to your dataserver and just configure your ModbusTCP client
- Service>Modbus>Modbus TCP Client
There you define your endpoints and the device you want to communicate
(scroll down) And the registers (and types) you want to have automatically read. Make sure the request name is logical as we’ll make that available in the MQTT payload.
You may test individual request by using the “testing” method below.
==============================================================================
So, now you’ve tested the request locally we can now setup the MQTT connection. Goto Services>Data To Server
Here you create a new COLLECTION which can hold multiple requests, so just “ADD” a new collection
You first configure the “collector” properties with a name, an interval period (1sec) and the type of payload.
And then you configure the MQTT broker, mines is served from within Homey Pro. Choose a logical Topic for the collector to publish to.
Then you add a new data configuration to the collector to publish retrieved data automatically to the MQTT broker.
Just apply now and connect to the broker using a client like MQTTX and you’ll see messages like:
{"ModbusTCP":{ "Amtron":
   { "ChargeCurrent":
      { "data":[32]
     }
   }
 }
}
====================================================================
{"ModbusTCP":{ "Amtron":
   { "AC":
      { "data":[30976004,-1,-1,0,-1,-1,3,0,0,30976004,0,224,-1,-1]
     }
   }
 }
}
====================================================================
==============================================================================
Now getting it into Homey:
Setup the MQTT HUB and MQTT Client in Homey (lots of details to find).
Create a MQTT Device, skip the capability configuration for now just create it.
Now edit the device and paste the following configuration:
{
  "evcharger_charging_state": {
    "capability": "evcharger_charging_state",
    "stateTopic": "Teltonika",
    "setTopic": "",
    "valueTemplate": "(value) => {if(value.ModbusTCP.Amtron.State.data[0] === 0) return 'plugged_out'; if(value.ModbusTCP.Amtron.State.data[0] === 1) return 'plugged_in'; if(value.ModbusTCP.Amtron.State.data[0] === 6) return 'plugged_in_charging'; if(value.ModbusTCP.Amtron.State.data[0] === 9) return 'plugged_in_paused';  }",
    "outputTemplate": "",
    "displayName": "Status"
  },
  "measure_number.target_current": {
  "capability": "measure_number",
  "stateTopic": "Teltonika",
  "setTopic": "",
  "valueTemplate": "(value) => { return value.ModbusTCP.Amtron.ChargeCurrent.data[0]; }",
  "outputTemplate": "",
  "displayName": "Current limit",
  "units": "A"
  },
  "evcharger_charging": {
    "capability": "evcharger_charging",
    "stateTopic": "Teltonika",
    "setTopic": "",
    "valueTemplate": "(value) => {if(value.ModbusTCP.Amtron.State.data[0] === 6) return 1; return 0  }",
    "outputTemplate": "",
    "displayName": "Charging"
  },
  "measure_current.L1": {
    "capability": "measure_current",
    "stateTopic": "Teltonika",
    "setTopic": "",
    "valueTemplate": "(value) => {return value.ModbusTCP.Amtron.AC.data[6] /1000}",
    "outputTemplate": "",
    "displayName": "L1 current"
  },
  "measure_current.L2": {
    "capability": "measure_current",
    "stateTopic": "Teltonika",
    "setTopic": "",
    "valueTemplate": "(value) => {return value.ModbusTCP.Amtron.AC.data[7] /1000}",
    "outputTemplate": "",
    "displayName": "L2 current"
  },
  "measure_current.L3": {
    "capability": "measure_current",
    "stateTopic": "Teltonika",
    "setTopic": "",
    "valueTemplate": "(value) => {return value.ModbusTCP.Amtron.AC.data[8] /1000}",
    "outputTemplate": "",
    "displayName": "L3 current"
  },
  "measure_power.total": {
    "capability": "measure_power",
    "stateTopic": "Teltonika",
    "setTopic": "",
    "valueTemplate": "(value) => {return value.ModbusTCP.Amtron.AC.data[0] /1000}",
    "outputTemplate": "",
    "displayName": "Power",
     "units": "kW"
  },
  "measure_voltage.L1": {
    "capability": "measure_voltage",
    "stateTopic": "Teltonika",
    "setTopic": "",
    "valueTemplate": "(value) => {return value.ModbusTCP.Amtron.AC.data[11]}",
    "outputTemplate": "",
    "displayName": "L1 Volt"
  },
  "measure_voltage.L2": {
    "capability": "measure_voltage",
    "stateTopic": "Teltonika",
    "setTopic": "",
    "valueTemplate": "(value) => {return value.ModbusTCP.Amtron.AC.data[12]}",
    "outputTemplate": "",
    "displayName": "L2 Volt"
  },
  "measure_voltage.L3": {
    "capability": "measure_voltage",
    "stateTopic": "Teltonika",
    "setTopic": "",
    "valueTemplate": "(value) => {return value.ModbusTCP.Amtron.AC.data[13]}",
    "outputTemplate": "",
    "displayName": "L3 Volt"
  },
  "meter_power.session": {
    "capability": "meter_power",
    "stateTopic": "Teltonika",
    "setTopic": "",
    "valueTemplate": "(value) => {return value.ModbusTCP.Amtron.Session.data[0] / 1000}",
    "outputTemplate": "",
    "displayName": "Session",
     "units": "kWh"
  },
  "measure_number": {
    "capability": "measure_number",
    "stateTopic": "Teltonika",
    "setTopic": "",
    "valueTemplate": "(value) => {return value.ModbusTCP.Amtron.Session.data[1]}",
    "outputTemplate": "",
    "displayName": "Session time",
    "units": "s"
  },
  "meter_power.total": {
    "capability": "meter_power",
    "energy": {"cumulative": true },
    "stateTopic": "Teltonika",
    "setTopic": "",
    "valueTemplate": "(value) => {return value.ModbusTCP.Amtron.AC.data[9] / 1000}",
    "outputTemplate": "",
    "displayName": "Total Energy",
     "units": "kWh"
  },
  "target_temperature.target_current": {
  "capability": "target_temperature",
  "stateTopic": "Teltonika",
  "setTopic": "Teltonika/Amtron/ChargeCurrent/set",
  "valueTemplate": "(value) => { return value.ModbusTCP.Amtron.ChargeCurrent.data[0]; }",
  "outputTemplate": "(value) => { return String(value); }",
  "displayName": "Current Limit",
  "units": "A"
 }
}
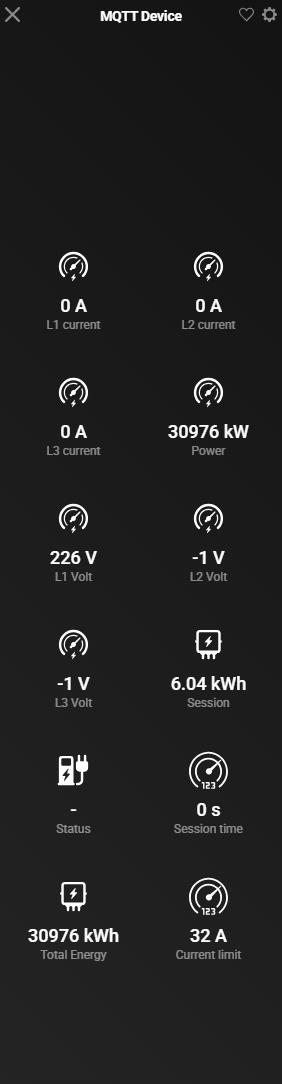
And then you’ll see:
Write for current limit is something I still have to do. Should be from an advanced flow using Something like:
{
  "cookie": 2,
  "type": 0,
  "host": "192.168.2.205",
  "port": 502,
  "timeout": 2,
  "server_id": 255,
  "function": 6,
  "register_number": 1000,
  "value": 10
}
Using a flow this can be done by:
That should be published to a topic corresponding to the settings in Services>Modbus>Mqtt Modbus Gateway
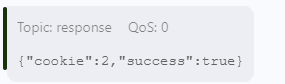
This results in:
and the ack: